The Patundas Meadows Trek in Pakistan is one of the country’s most spectacular, and criminally underrated, high-altitude adventures. Even after hiking in some of the world’s most iconic regions like the Alps, Patagonia, Nepal, New Zealand, Kyrgyzstan, and Iceland, Patundas still stands out as one of my all-time favourite treks.
What makes it so special isn’t just the scenery (though that’s jaw-dropping) but the sheer variety packed into such a short and relatively accessible hike. Within just a few days, you’ll cross a glacier (twice), sleep under a blanket of stars, and stand on a vast alpine plateau at 4,200 meters surrounded by 6,000+ meter peaks: Passu Sar, Shispare, Ultar, and more. The sense of scale is surreal. There are no crowds, no luxurious tea houses or huts, just raw wilderness and silence that humbles you.
This post is your complete guide to the Patundas Meadows Trek in Pakistan, including everything you need to know to plan your hike, where to stay, and how to hire a guide. If you’re looking for a high-altitude trek with a serious “wow” factor and without the crowds of Nepal or the Alps, this is it.
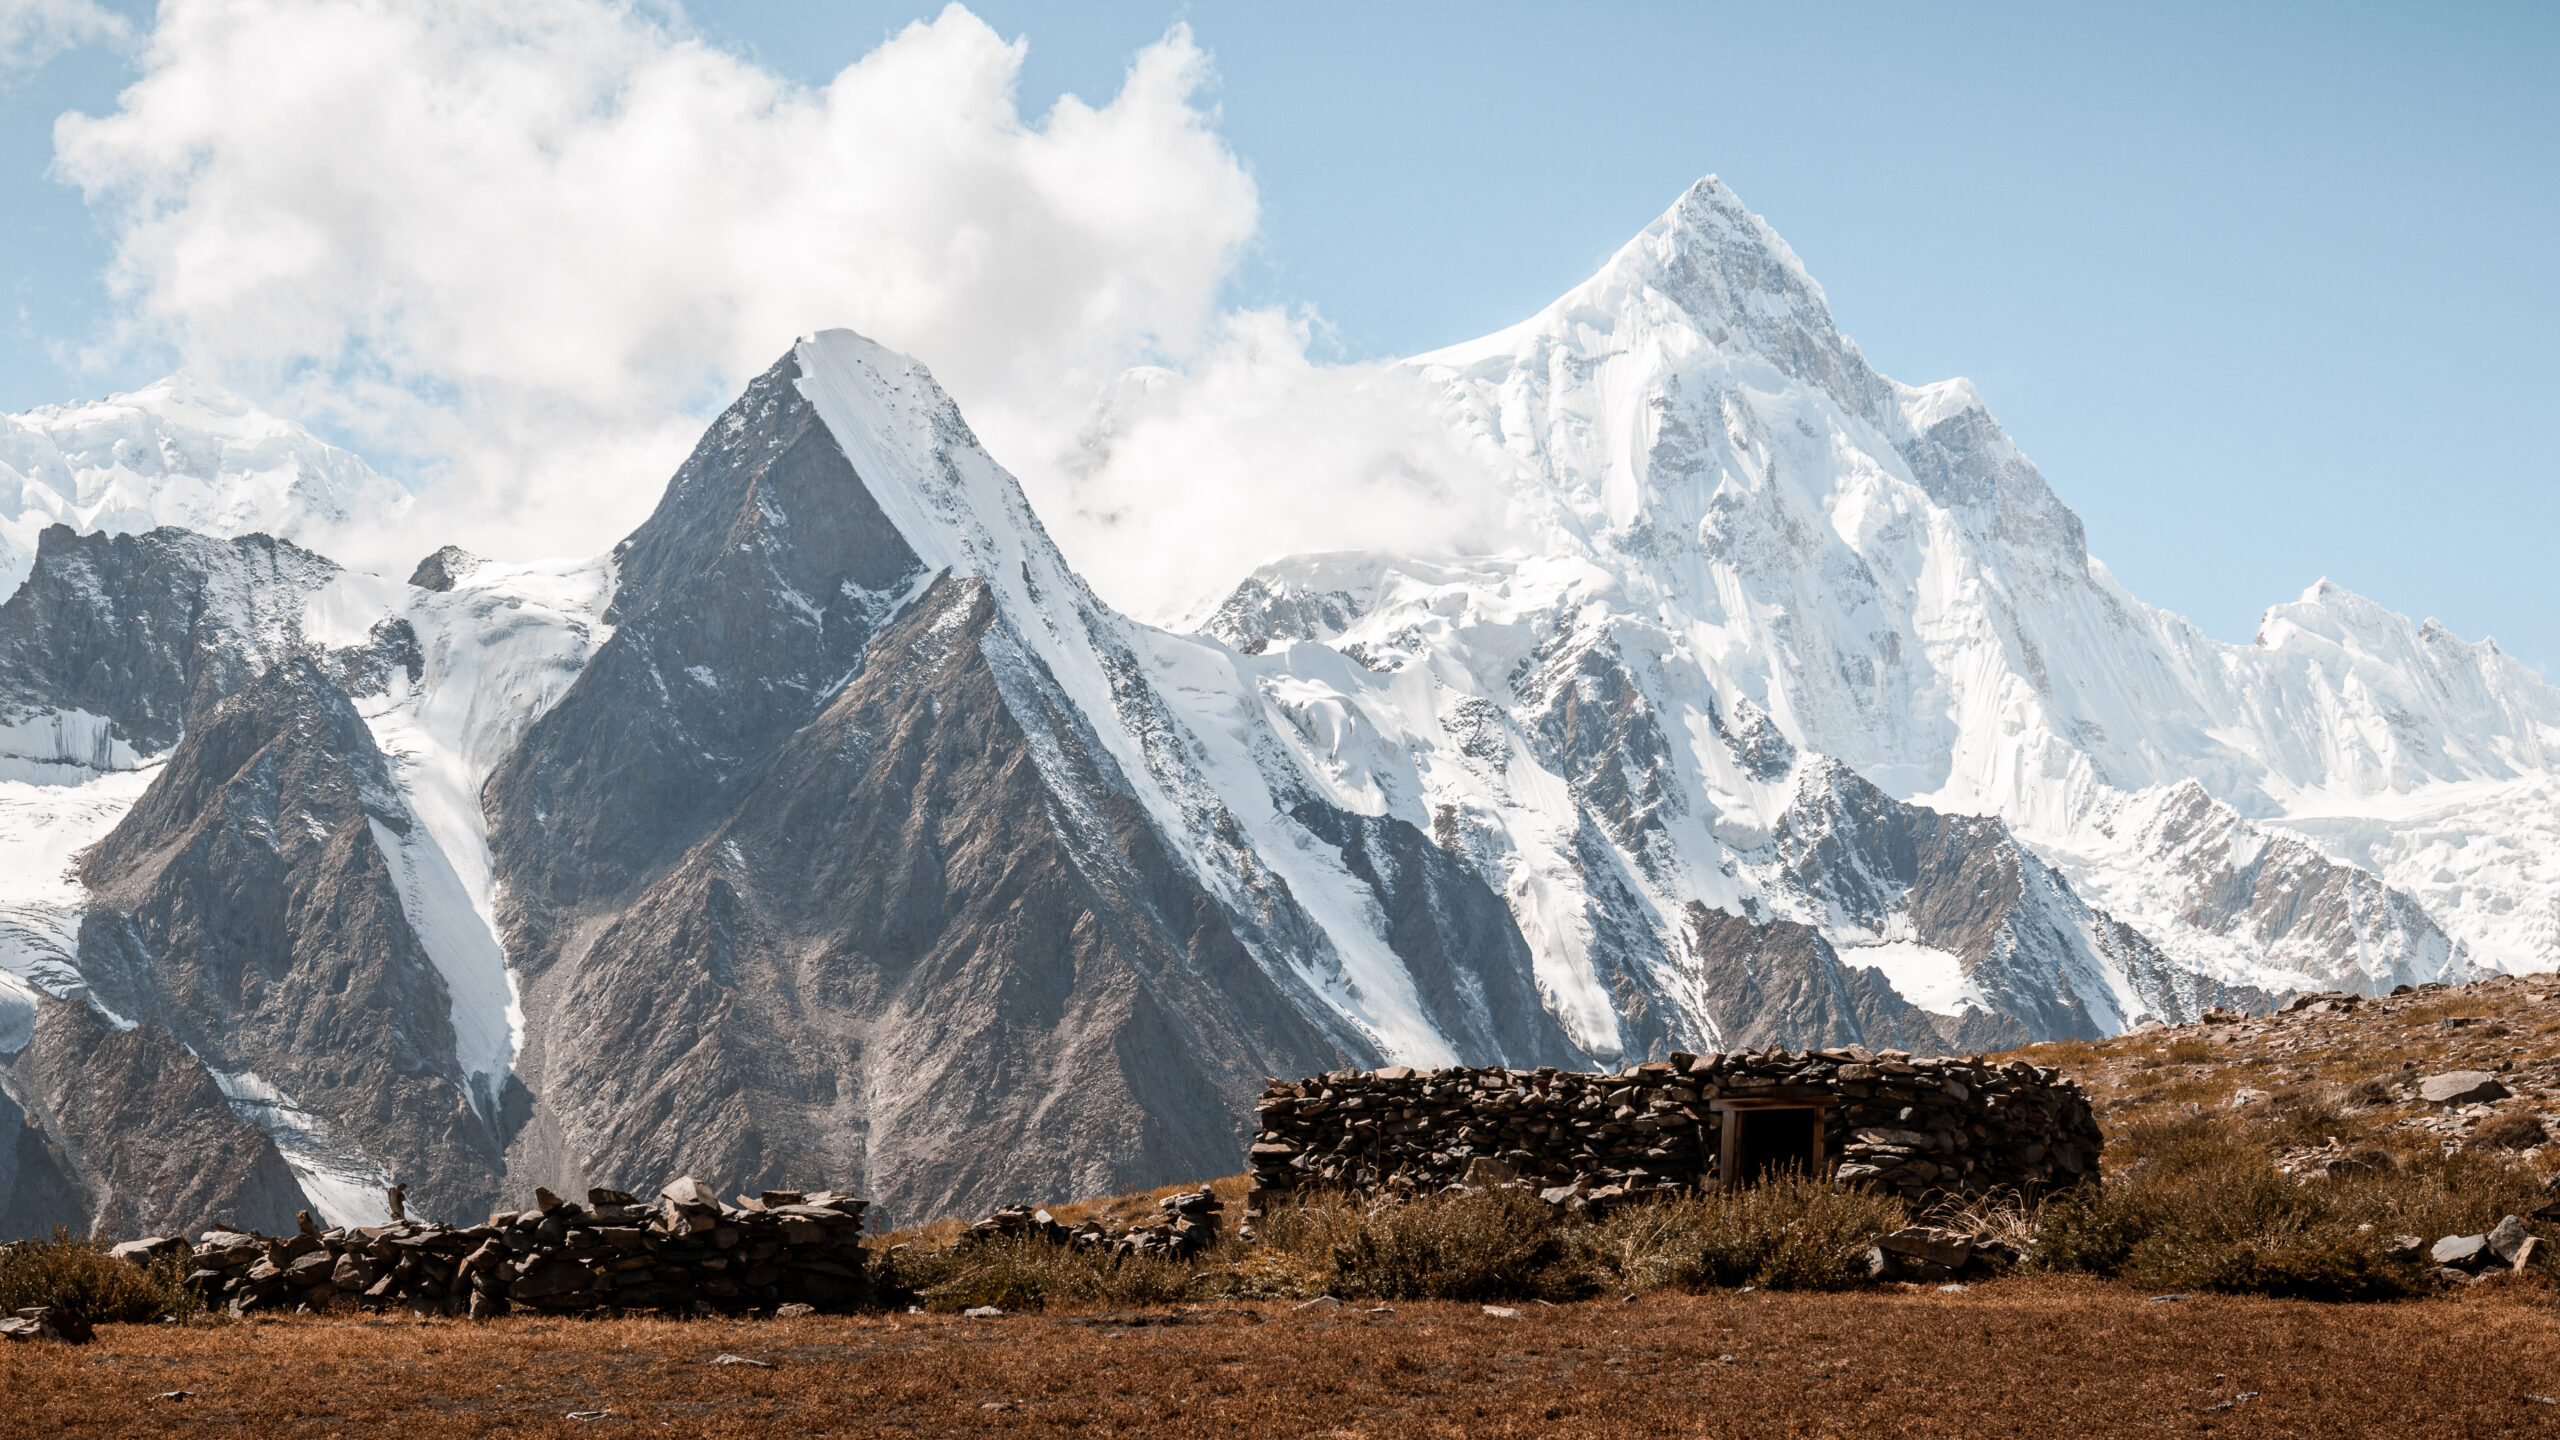
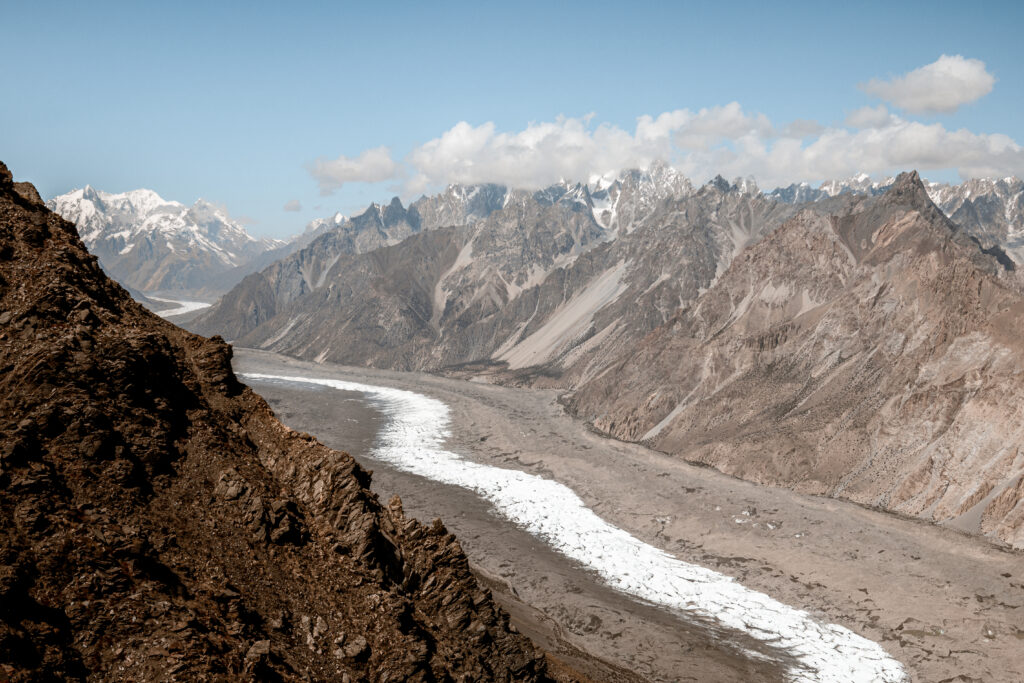
 Patundas Meadows: Views of Batura and Passu Glacier
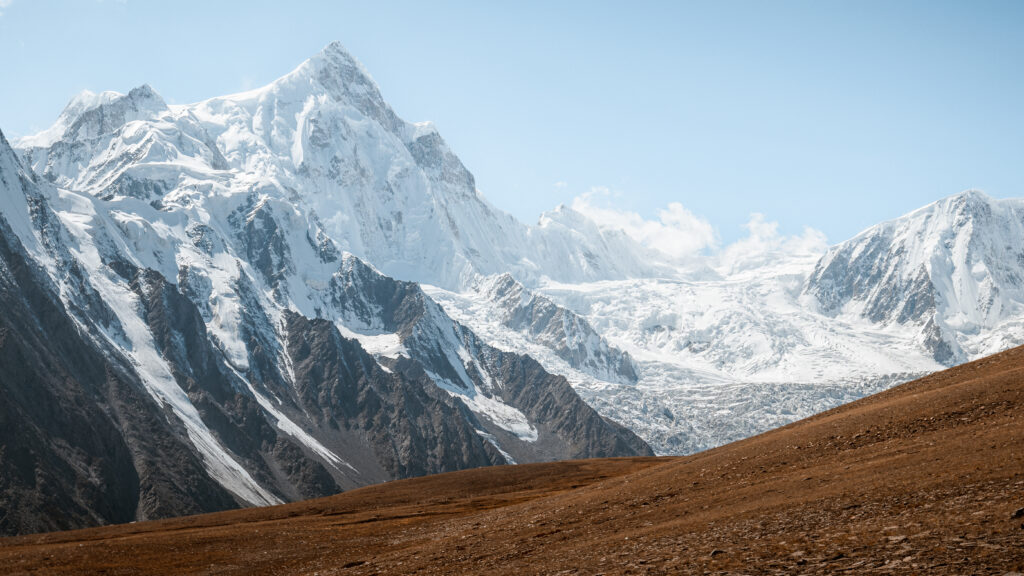 Patundas Meadows: Views of Passu Glacier and Shispare Peak
Where Is the Patundas Meadows Trek
The Patundas Meadows Trek is located in Upper Hunza (Gojal) in the Gilgit-Baltistan region of northern Pakistan. The trailhead sits just beyond Borith Lake, between the villages of Gulmit and Passu along the Karakoram Highway.
The best base for the trek is Ghulkin village, a small, quiet settlement about 30 minutes by car from the trailhead. This is where I stayed and where I arranged all the logistics. You can also base yourself in Passu, which has more guesthouse options and is easy to find other travellers to split costs with.
Getting there from the main hubs:
Once in Ghulkin or Passu, the trailhead is easy to reach with help from your guesthouse. My accommodation before the trek was at Rehman’s homestay in Ghulkin, which was also where I arranged all the logistics for the trek. The day of the trek we had a 30-minute drive to the trailhead, just beyond Borith Lake. You can also opt to stay at Rehman’s Backpacker Hostel right on the Karakoram Highway and it’s possible to arrange the trek there as well.
Booking a Guide and Patundas Meadows Treks’s Costs
I organised all the logistics including the guides while staying in Ghulkin Village. It’s a small village and you can arrange your trek within 24-48 hours. I’d recommend doing it with other travellers in order to split the cost. The cost of the trek will depend on how many people and how many guides/porters are necessary.
I organised the entire trek while staying at Rehman’s Homestay in Ghulkin village, which is about 30 minutes from the trailhead. It’s a small, tight-knit community and arranging everything locally is straightforward. Give yourself 24-48 hours to sort the logistics before your start date.
The total cost for our group of 3 people was $140 per person for 3 days, and that covered everything: transport to and from the trailhead, permits, guide and porter fees, all camping gear (tents, sleeping bags, mats), and all meals on the trail (breakfast, lunch, and dinner each day). You don’t need to bring food or cooking equipment. The guides sort all of that and the meals are genuinely good: proper home-cooked mountain food, not just instant noodles.
The cost per person will vary depending on group size. If you’re travelling solo, I’d strongly recommend finding other travellers to join before arranging the trek, ask at your guesthouse or hostel in Passu, Ghulkin, or Karimabad. It won’t take long to find people headed the same way.
A few things worth knowing about money on this trek:
Avoid ATM fees with Wise
The card I use for all my travel withdrawals – real exchange rate, low fees.
Use Revolut to avoid ATM fees
Good alternative to Wise – I carry both as a backup.
Essential Tips for Trekking to Patundas Meadows
1. Acclimatisation is key.
Patundas sits at over 4,000 metres, so don’t underestimate the altitude. If you’ve just arrived in the Hunza Valley, give yourself at least a couple of days to acclimatise in places like Karimabad or Passu before heading up. I’d recommend you to go on other treks before doing this one. Altitude sickness is real and can hit hard if you rush it.
2. You’ll definitely need to hire a guide.
While it’s technically possible to trek independently, I wouldn’t recommend it. Crossing the Passu Glacier can be confusing and even dangerous even with experience. The trail isn’t always obvious and conditions change. Doing it with a local guide can make this part far safer and smoother.
3. Pack for wild weather.
At that altitude, weather can shift in minutes. Bring proper layers – thermal base layers, a warm jacket, windbreaker, gloves, and a rain shell. Nights at Patundas can get freezing cold, even in summer.
4. Carry enough water and purification methods
There are limited water sources after the glacier, and some may not be safe to drink untreated. Bring a good filter or purification tablets, and carry plenty of water for the day’s hike.
5. There are no facilities at the top:
Unlike popular trekking regions like Nepal, Patundas has no lodges, food stalls, or permanent shelters. You’ll need to carry your own tent, sleeping bag, and food. But since you’ll have a guide, he’ll deal with all the logistics and carry all the gear and extra water.
6. Be prepared for physical challenge.
The trek is short but demanding. The combination of altitude, steep inclines, and glacier navigation makes it best suited for reasonably fit hikers. Train accordingly.
7. Don’t forget sun protection.
The sun at high altitude is intense. Bring high SPF sunscreen, sunglasses, and a hat, the UV rays up there are no joke.
8. Best season is late spring to early autumn (June – October).
This is when the trail is usually clear of snow and the meadows at Patundas are lush and green. In early summer, you’ll also get beautiful wildflowers. Late September brings golden hues and fewer trekkers.
9. Get travel insurance that covers trekking and high-altitude activities.
Don’t skip travel insurance!
I use SafetyWing for most trips – solid coverage for adventure travel.
What to Pack for the Patundas Meadows Trek
Here’s a Packing List tailored specifically for the Patundas trek, keeping in mind its short duration, high altitude, and glacier crossing.
Only needed if you’re trekking independently (no guides), which I definitely don’t recommend. Otherwise your guide will get you all the camping gear if you don’t have your own. Also you won’t have to worry about food or water. They’ll sort out all that for you and you’ll get some surprisingly complex and nutritious home cooked meals in the mountains.
My Day-by-Day Experience on the Patundas Trek
Trek Overview
Best Season: April/May to October (depends on weather)
Distance: 30 km roundtrip
Duration: 3 days (2 nights)
Elevation gain: ~2000 metres from Borith Lake to Patundas Camp One
Highest Point: ~ 4200 meters
Difficulty: Moderate to Challenging
Accommodation: Camping only
Guide? Yes! Glacier crossing is impossible to do without a guide
Day 1: Borith Lake to Passu Glacier Camp
The journey began in Ghulkin village, where I’d been staying for a few days, soaking in the quiet rhythm of mountain life. It was also where I arranged the trek. Early that morning, we packed our gear into the trunk of the homestay owner’s car, and he kindly drove us all the way to the trailhead – a bumpy 30-minute ride through dusty roads that twisted past Borith Lake, shimmering in the soft light of the early sun.
 Road to Patundas Trek
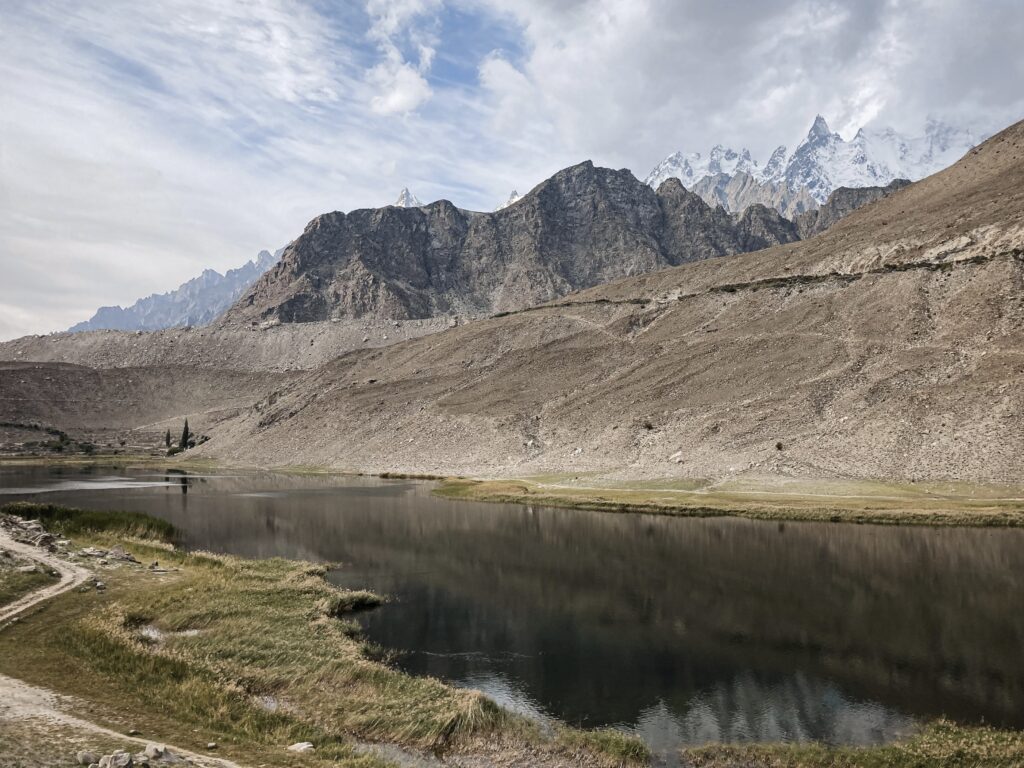 Borith Lake in Northern Pakistan
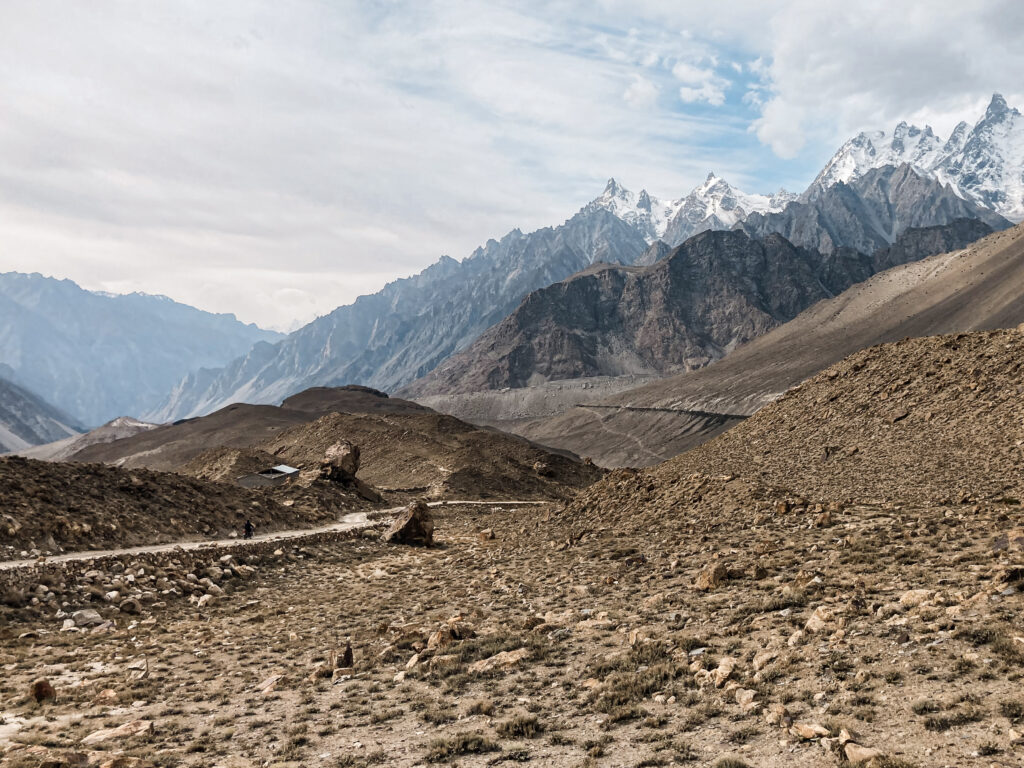
The trail begins just beyond the lake. The first stretch, leading to the glacier viewpoint, is a popular day hike, though at this hour, the mountains were ours alone. Silence filled the crisp morning air, broken only by the crunch of our footsteps on loose rock. Even from the very start, the views were spellbinding: the serrated peaks of the Passu Cones piercing the sky, and the glacier below.
 Beginning Patundas Trail: Passu Cones
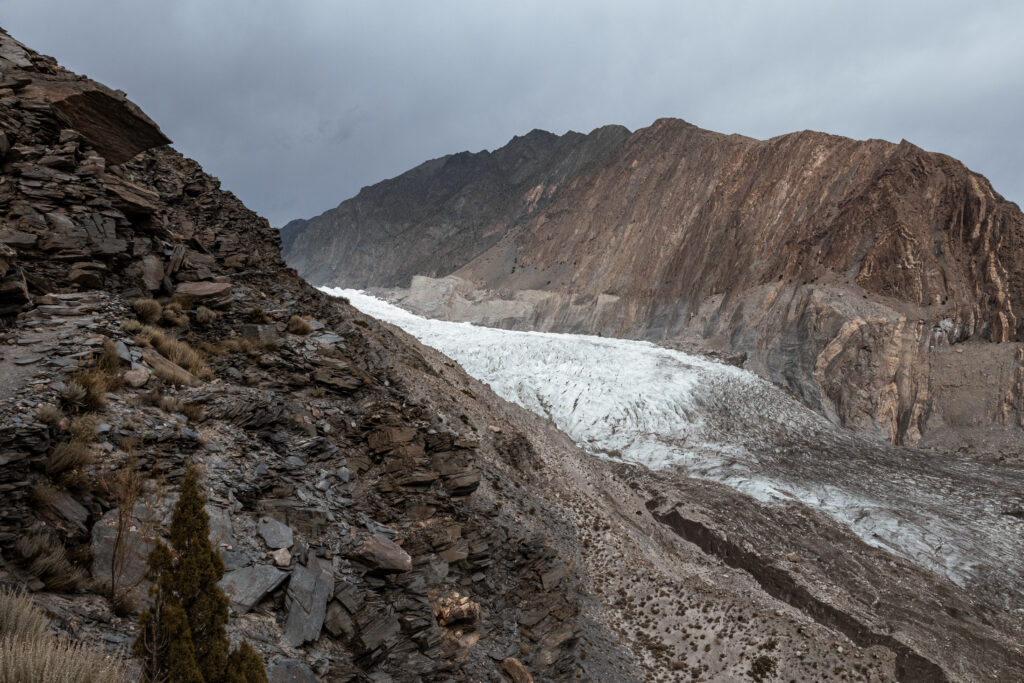 Beginning Patundas Trek: Passu Glacier
 Patundas Trek: Passu Glacier Viewpoint
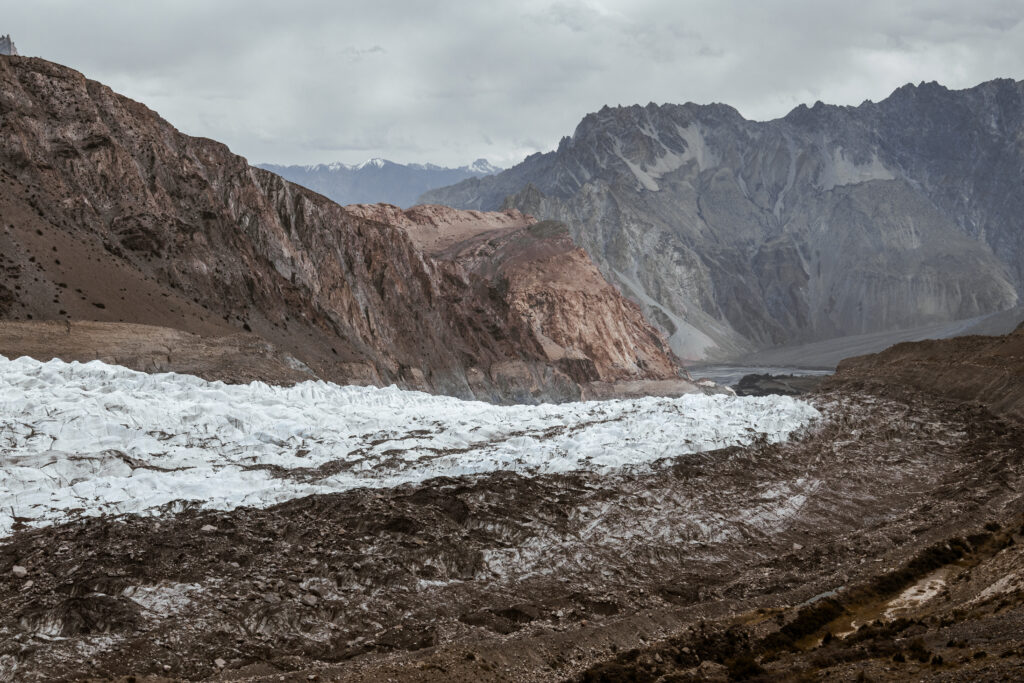 Patundas Trek: Passu Glacier Viewpoint
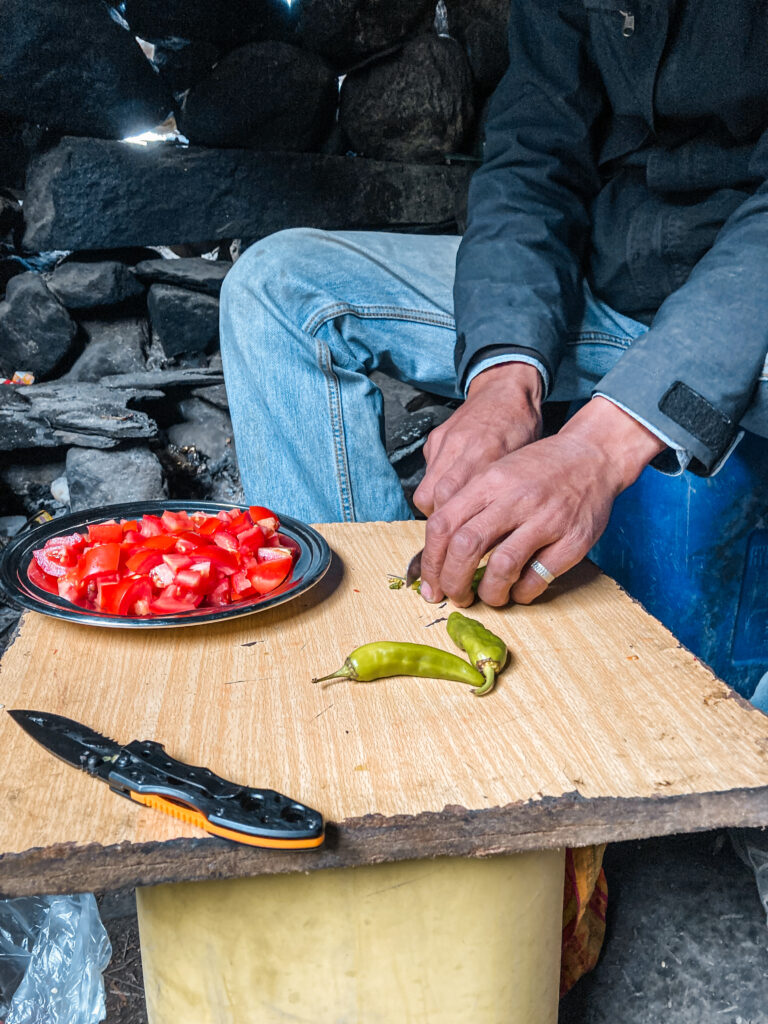
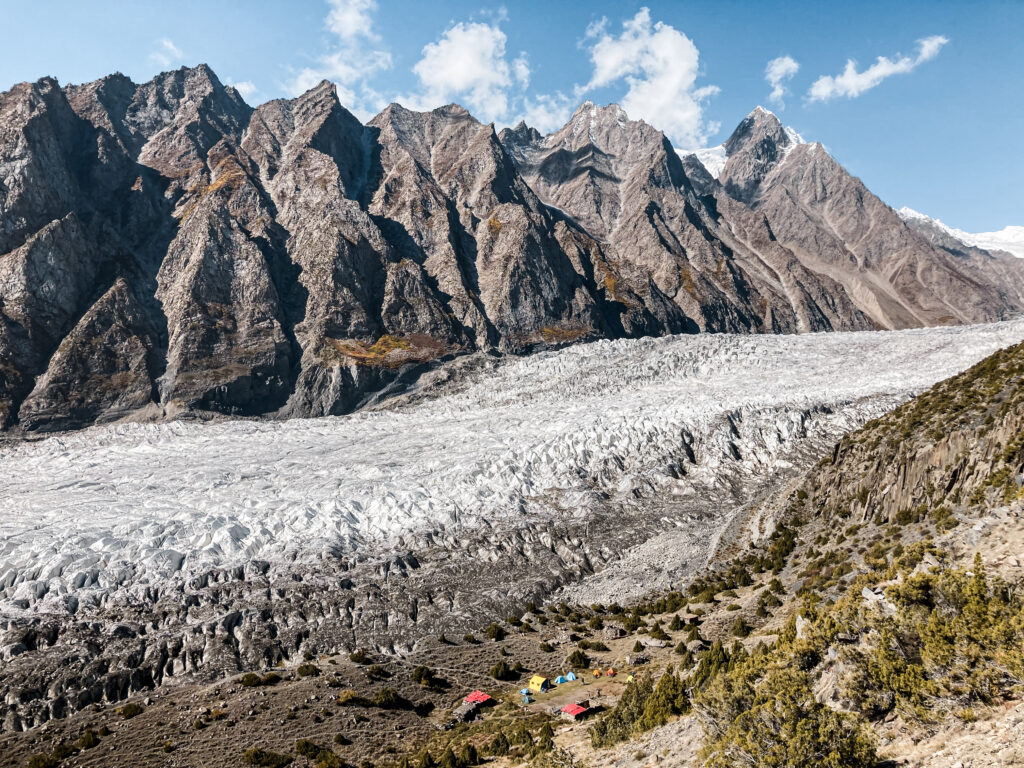
We followed the left flank of the glacier on a rocky, exposed path that gradually gained elevation. The climb became steeper, testing our legs and lungs. Eventually, we reached a simple stone hut, perched high above the valley. Our guide lit a small fire to boil water, and we sat down for a well-earned break, sipping tea and munching on biscuits. A cold spring nearby offered a chance to refill our bottles with fresh glacier water. The stillness, the scale, the solitude – it already felt like we were somewhere otherworldly.
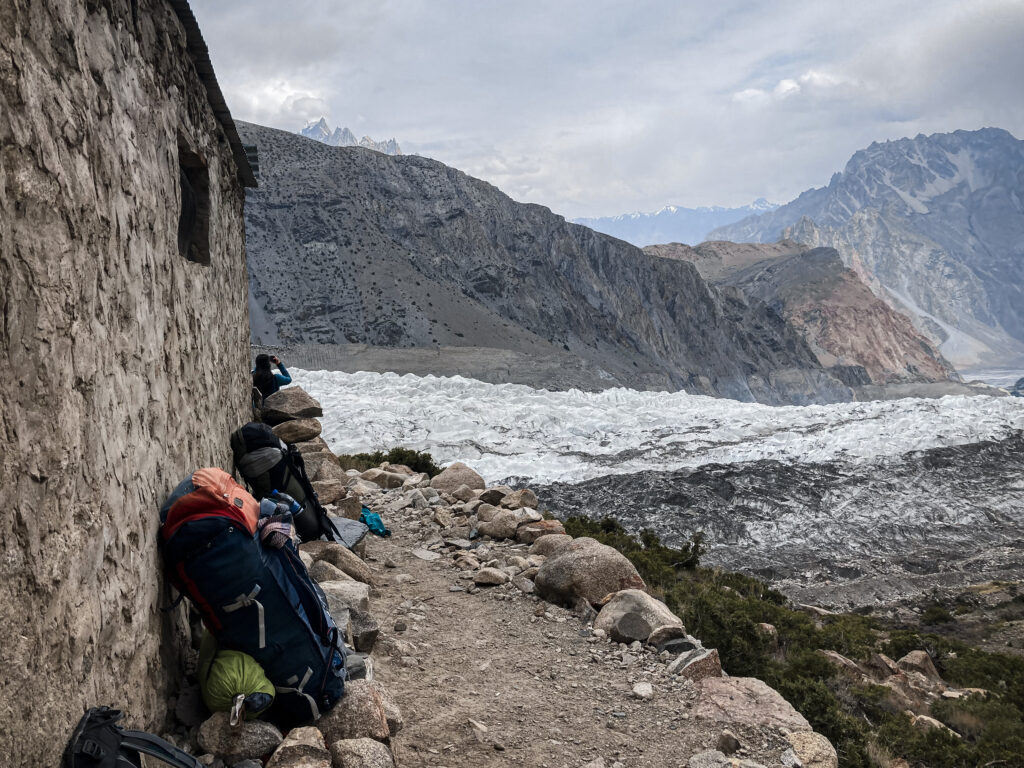 Mountain Hut with views over Passu Glacier
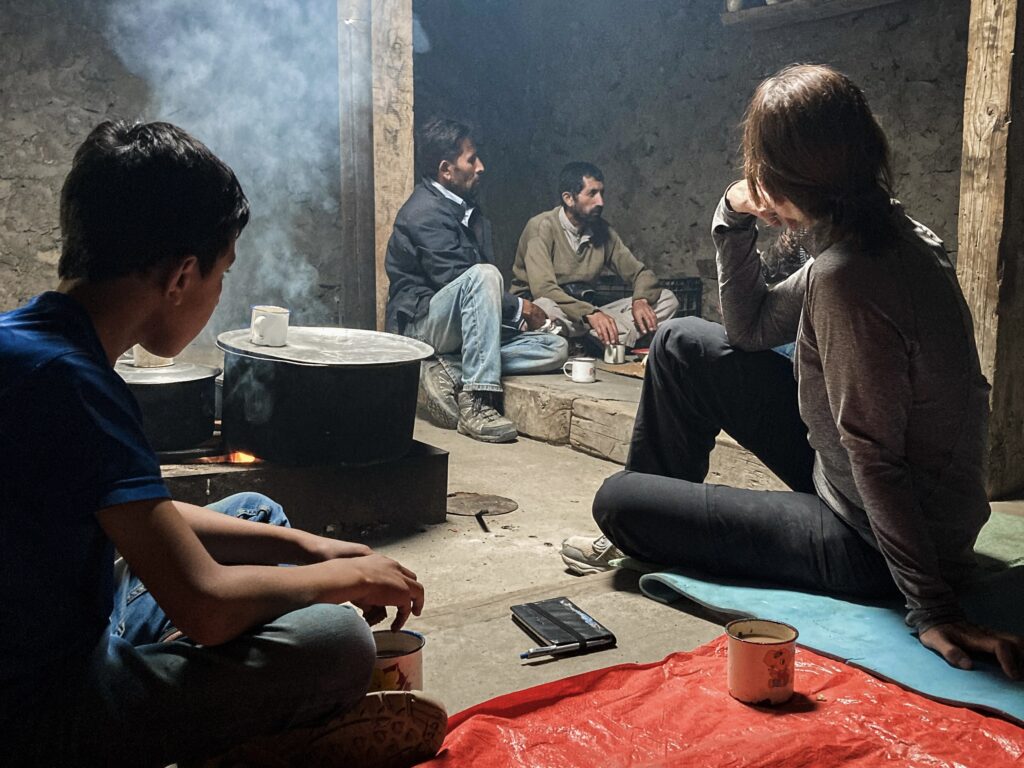 Break time for some chai with the guides and porters
After tea, the trail turned serious.
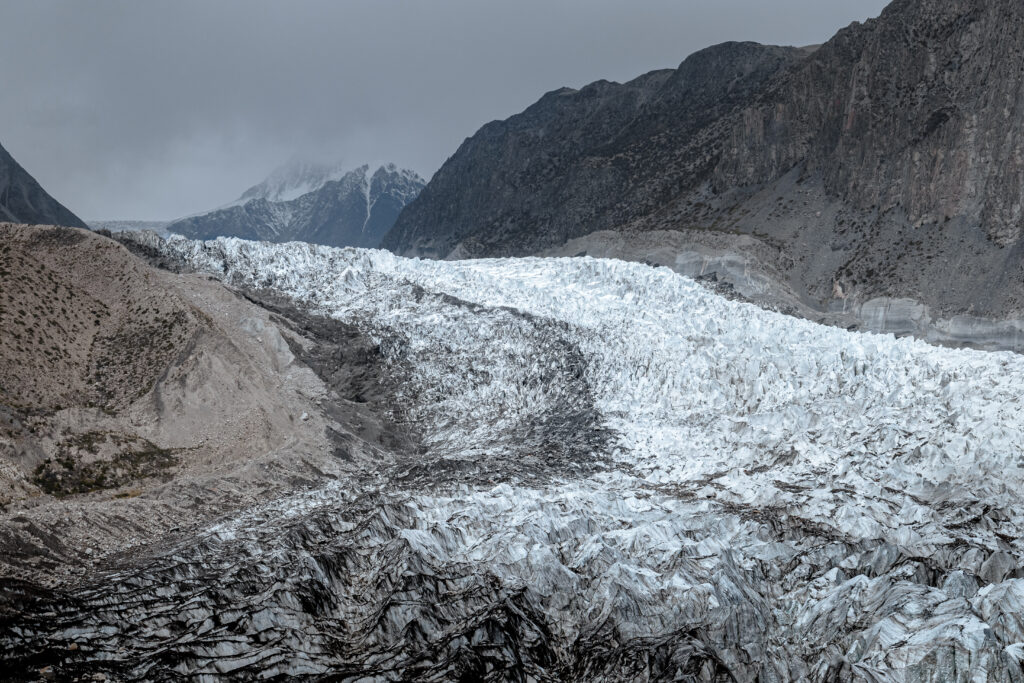
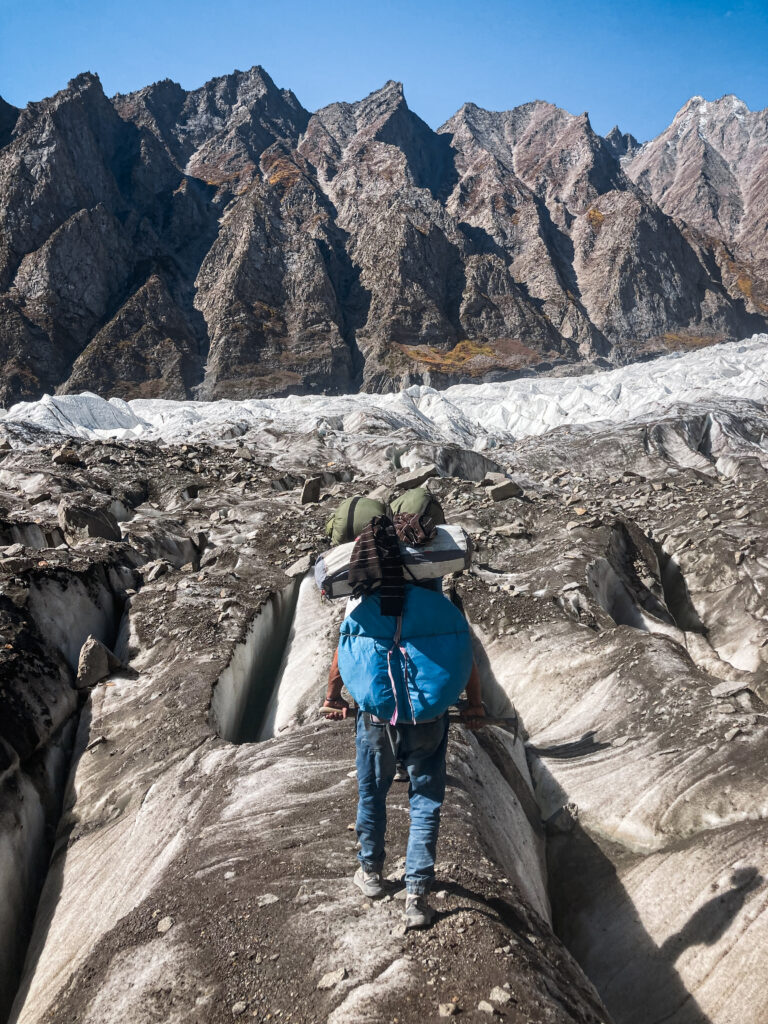
We continued upwards until reaching the edge of a ridge that sloped sharply down to the glacier. This was the most treacherous part of the trek, and the reason why having a guide is absolutely essential. The glacier shifts constantly, and our guide ventured ahead to scout the safest crossing. To get down to the ice, we first had to descend a section of unstable scree and boulders, loosened by past landslides. Every step felt like a gamble: place your weight wrong, and a whole slab might tumble.
Once on the glacier, the atmosphere changed completely. The surface was jagged and cracked, laced with deep crevasses on either side of a narrow, icy path. We followed our guide’s footsteps exactly, carefully threading our way across the frozen chaos. As we moved toward the centre of the glacier, the path widened slightly, offering a little mental relief and space to breathe. But the sheer sense of exposure, the gleaming blue ice, and the echoing silence made the crossing unforgettable – intense and beautiful all at once.
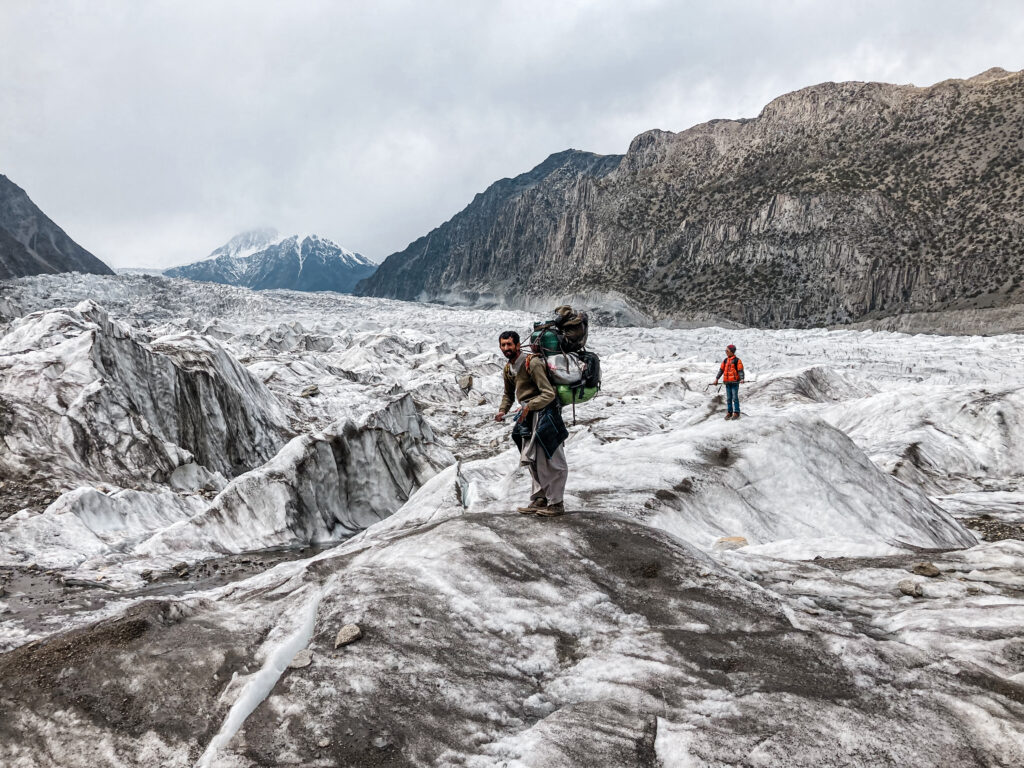 Our guide/porter helping us cross the Passu Glacier
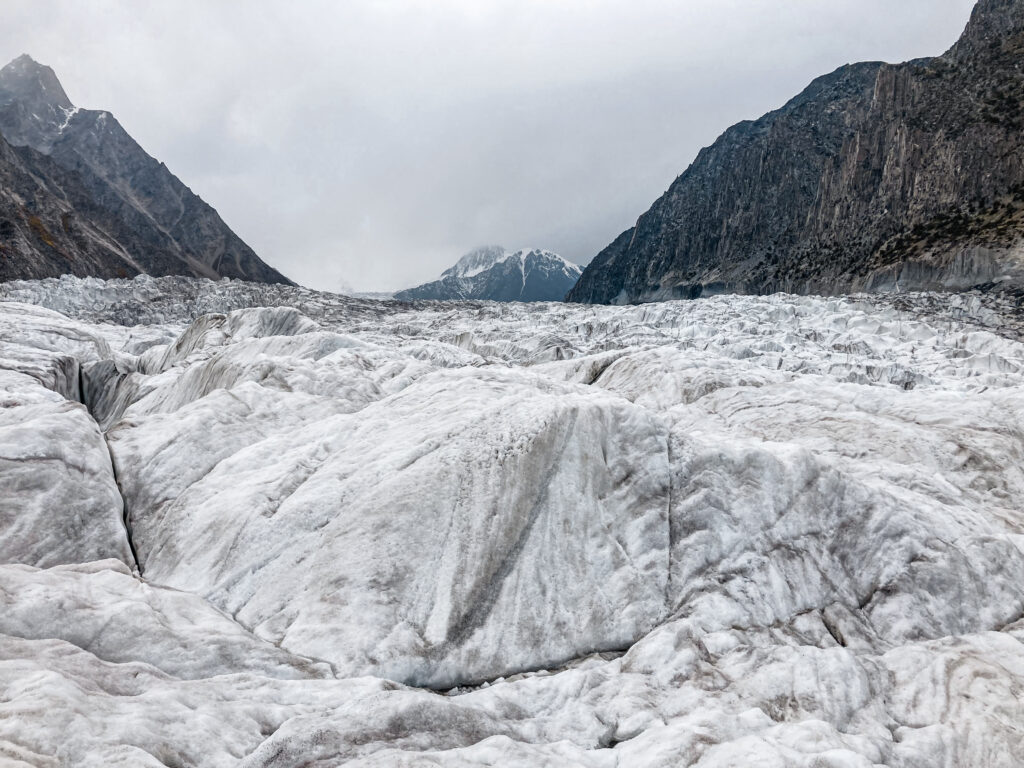 Crossing the Passu Glacier
After nearly two hours on the glacier, we stepped off the far edge with a collective sigh of relief. One final push remained – a short but brutally steep hill that led us to the lower Patundas camp, a meadow set just by the glacier’s edge.
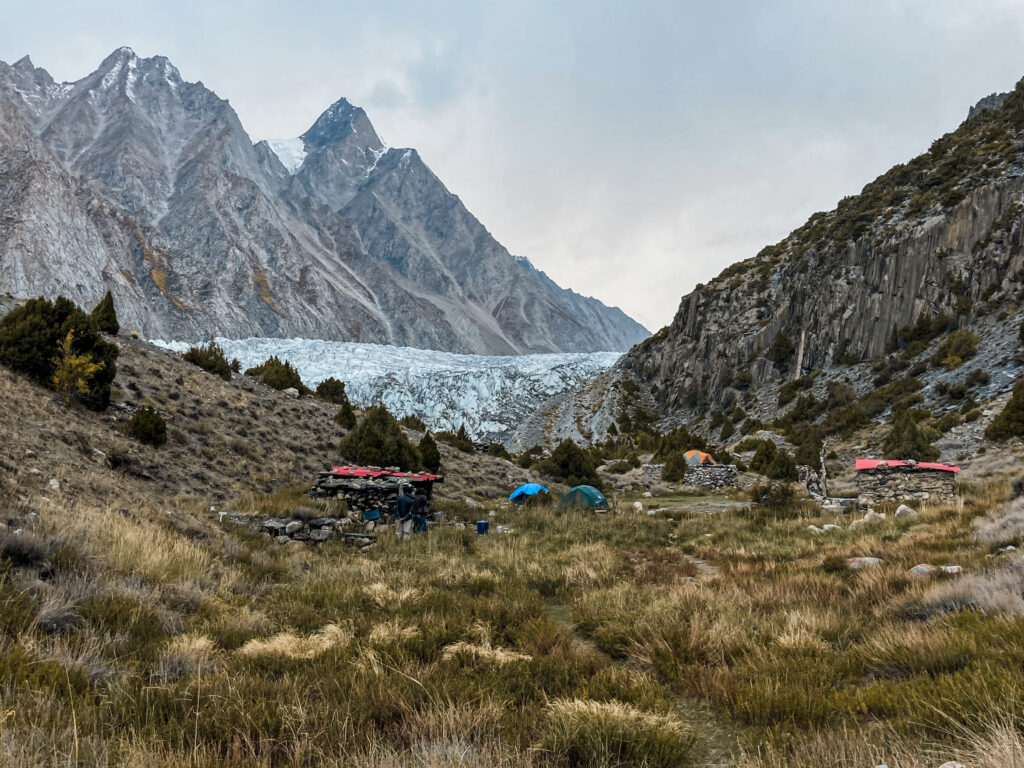
We arrived around 3 p.m., our muscles sore but spirits high. Our guides marked the moment with a small celebratory dance. While we warmed up beside the fire with a cup of steaming noodle soup, they set up our tents. From camp, the views of the Passu Glacier were simply mesmerising – I sat at the edge of the ridge for what felt like hours, hypnotised by the shifting light on the ice and the towering peaks that surrounded us.
 Passu Glacier
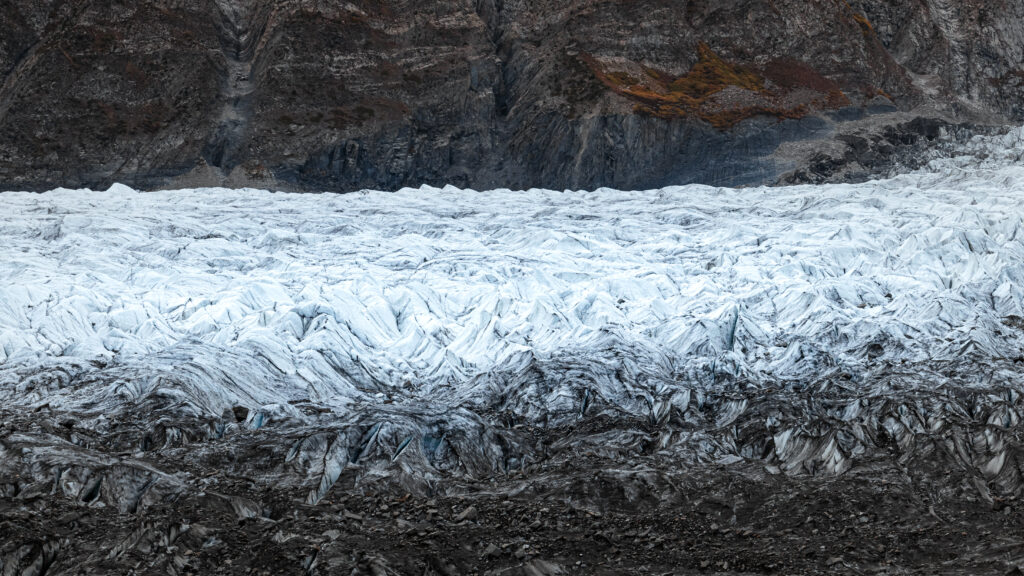 Passu Glacier
As night fell, we gathered around the fire once more for a hearty dinner of rice, noodles, and vegetable stew, followed by a few rounds of local board games. Then it was time to crawl into our tents, falling asleep to the cold mountain air and the soft murmur of the glacier below.
 Dinner Prep at Lower Patundas Camp
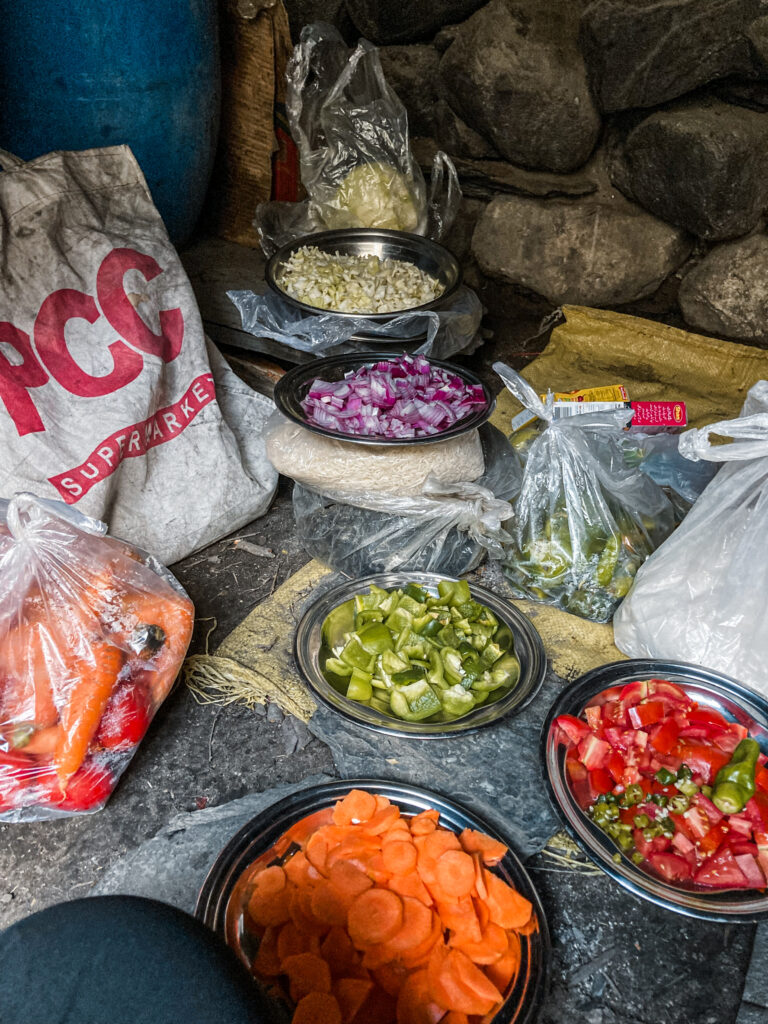 Dinner Prep at Lower Patundas Camp
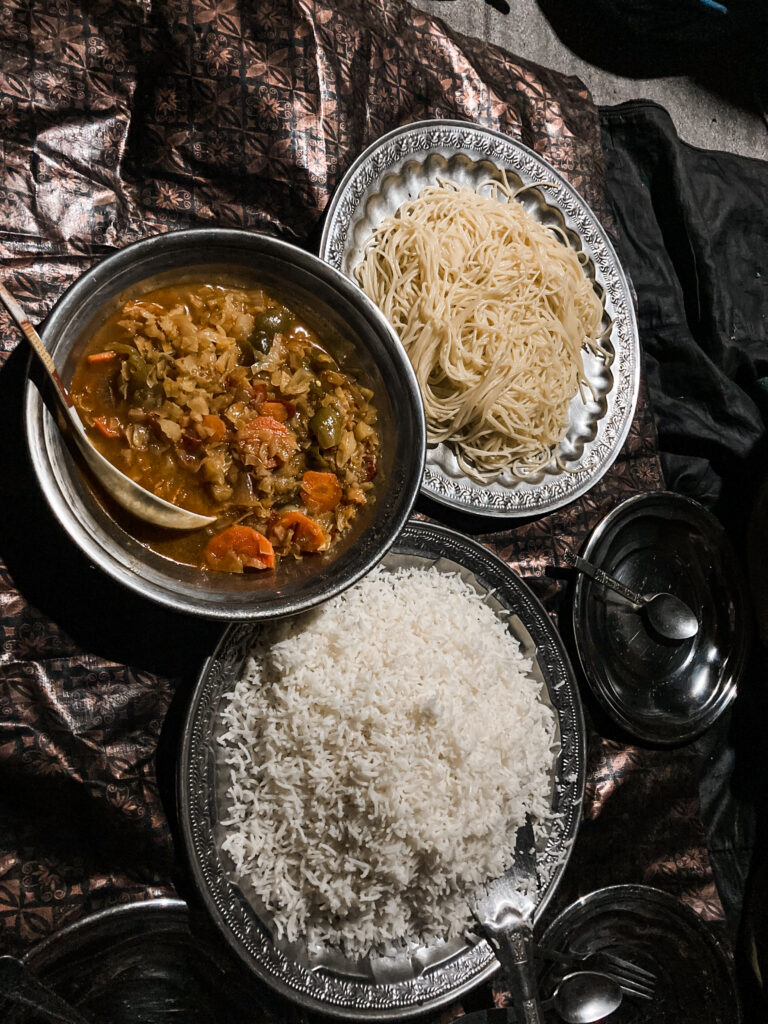 Dinner at Lower Patundas Camp
Day 2: Ascent to Patundas Meadows and Return to Camp
I woke to the soft chill of dawn, my breath hanging in the cold air inside the tent. Outside, a thin veil of mist floated above the glacier, and the first golden light of morning lit up the jagged peaks surrounding our camp. After a warming breakfast of paratha, omelette, and chai, we packed light, leaving our main gear behind, and set off toward the goal that had drawn me here in the first place: the Patundas Plateau.
 Breakfast preparation with freshly made paratha
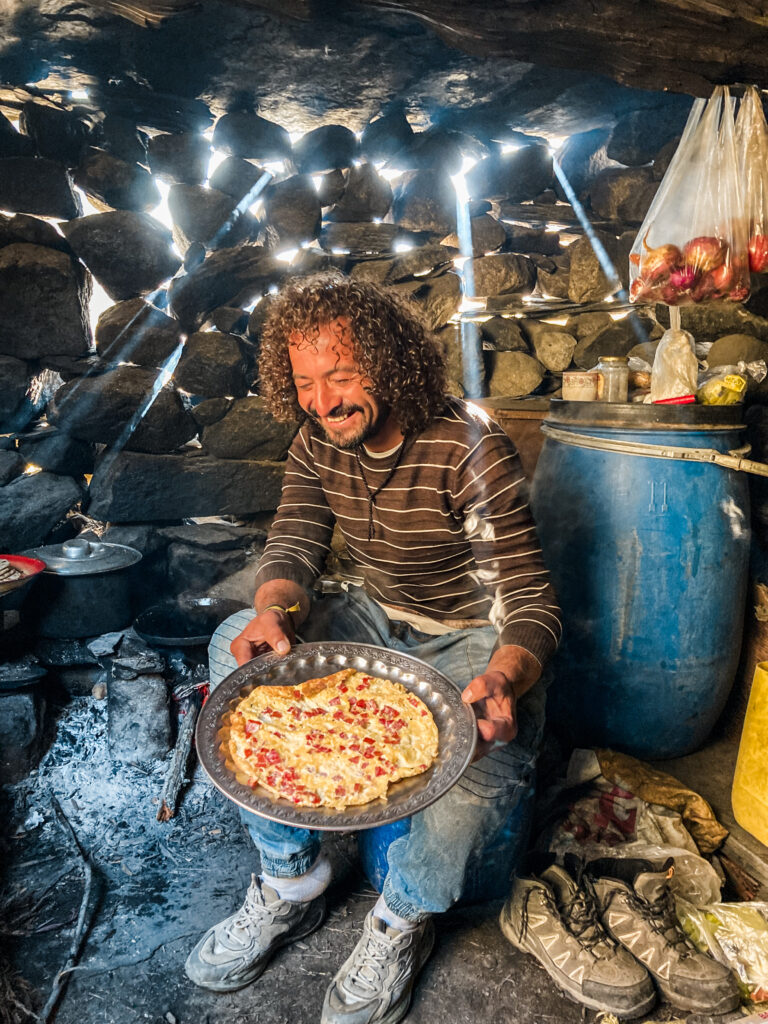 Breakfast omelette cooked by our guide
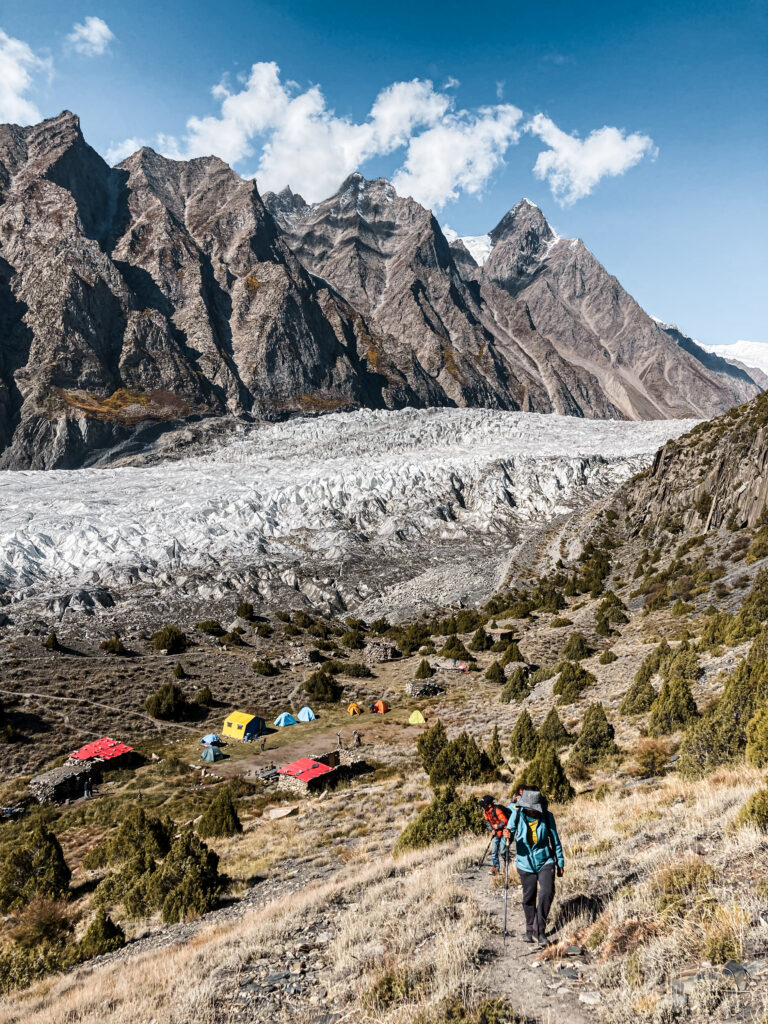 Leaving the Lower Camp behind
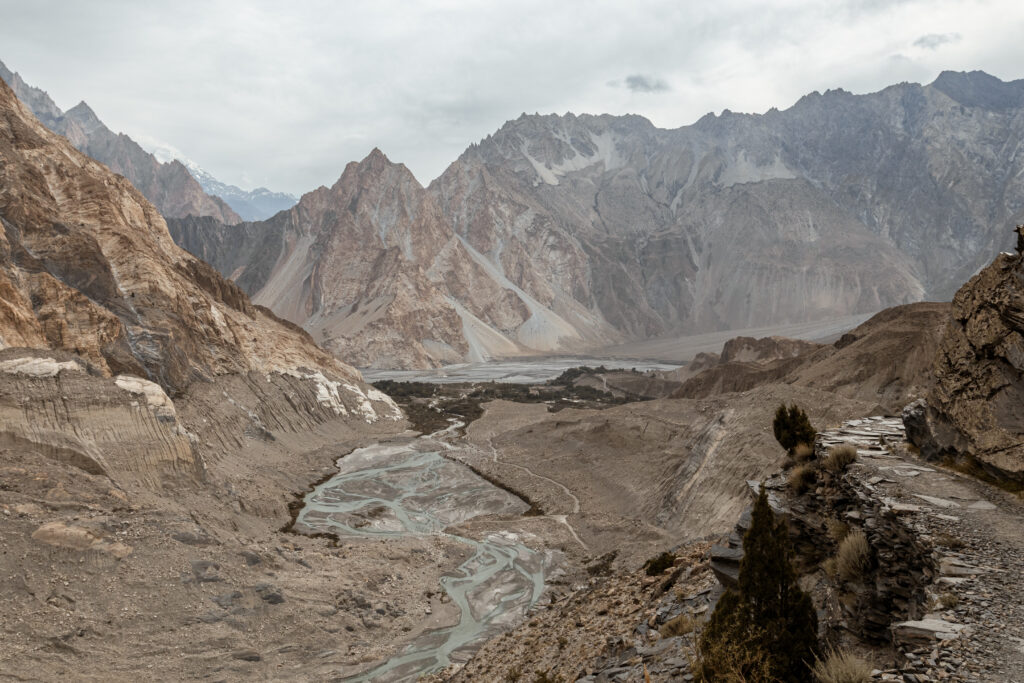
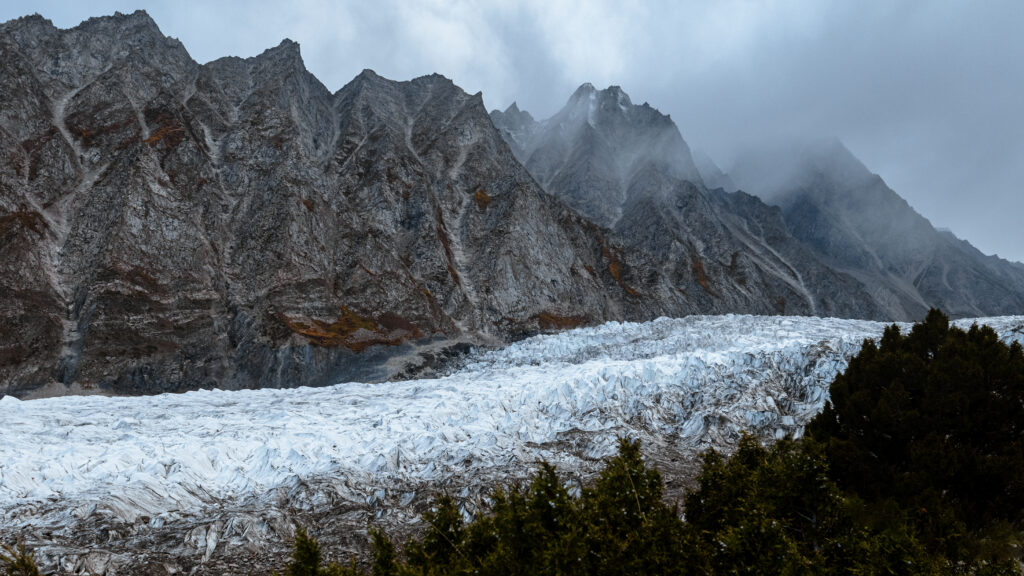
The trail wastes no time. It climbs the wall directly behind the lower camp – a brutally steep ascent and a tough way to start the morning. We gained around 700 metres of elevation in just a couple of kilometres, zigzagging up a series of relentless switchbacks. At over 3,500 meters, the altitude made every step more laboured, but the views became increasingly spectacular. With each metre gained, the scale of the Passu Glacier revealed itself: an immense river of ice carving through the valley far below.
 Views of the Camp and Passu Glacier
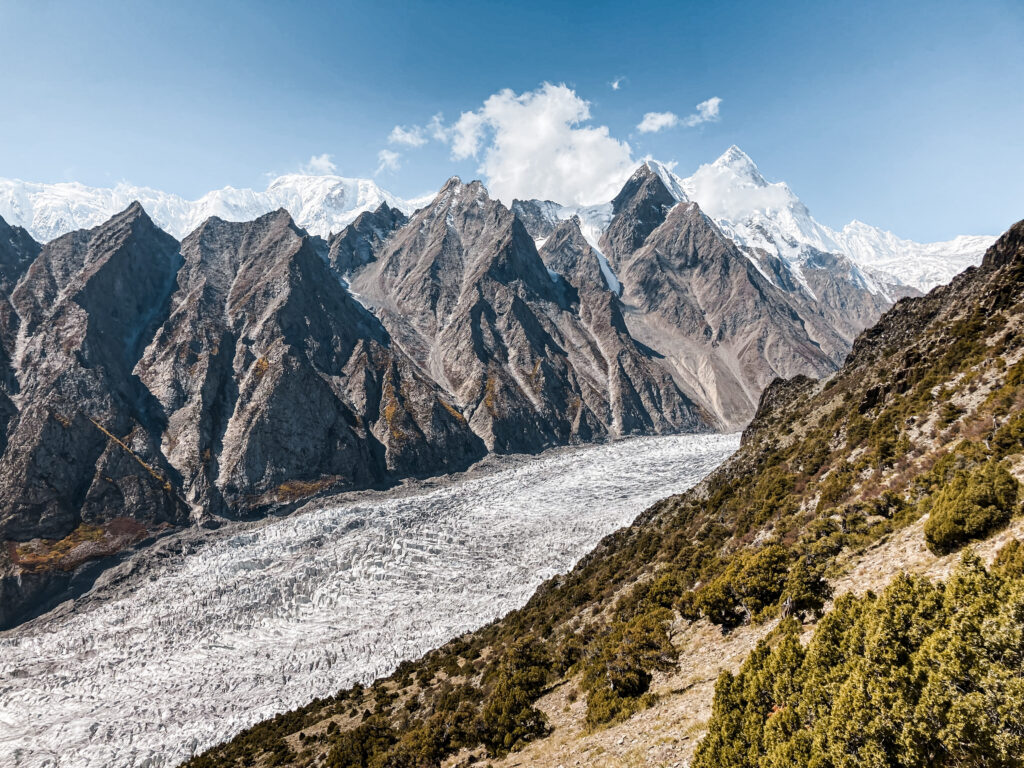 Views of Passu Glacier
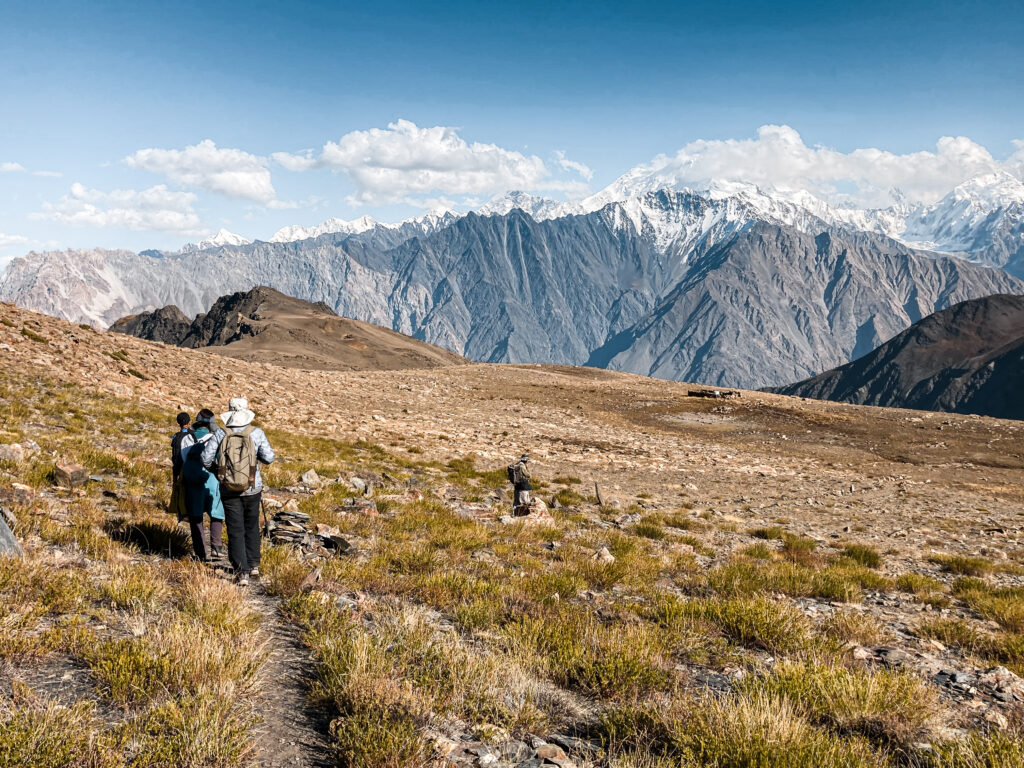
After what felt like a vertical eternity, the slope gave way to a gentler false plateau. Here, we caught our first glimpses of the legendary peaks surrounding Patundas. Though the air was thinner and my legs heavier, adrenaline kicked in. After 3h of gruelling uphill, it was time for the final push – and then, at last, we crested the final ridge.
I will never forget that moment.
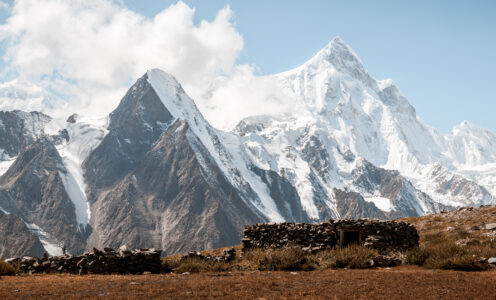
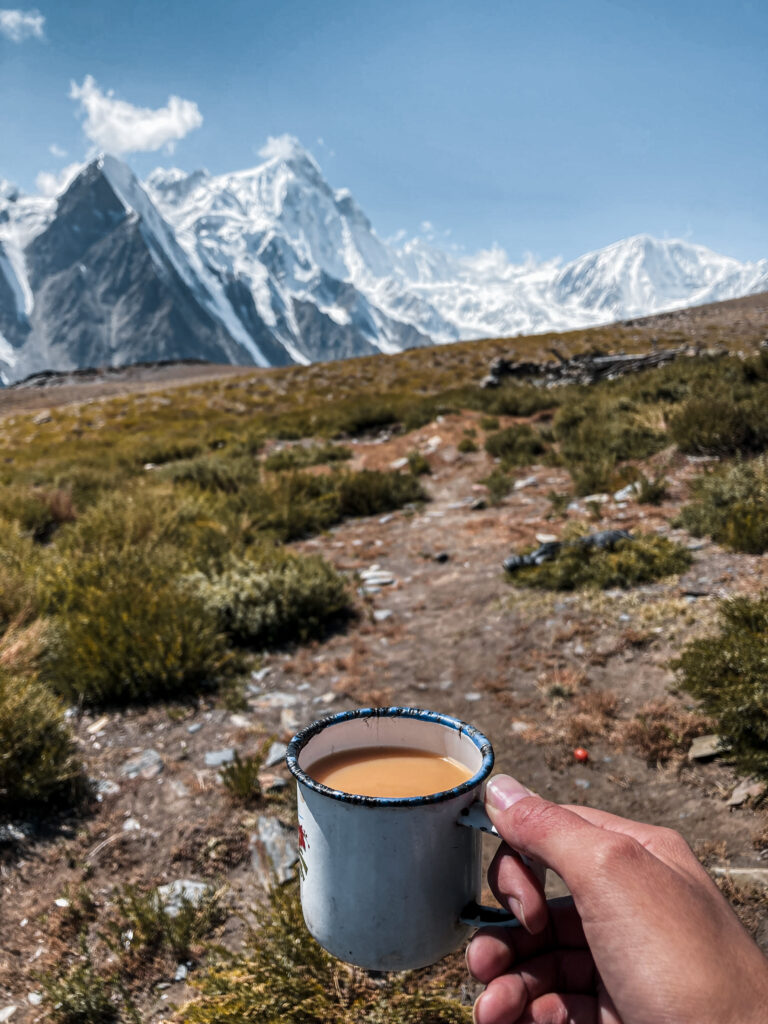
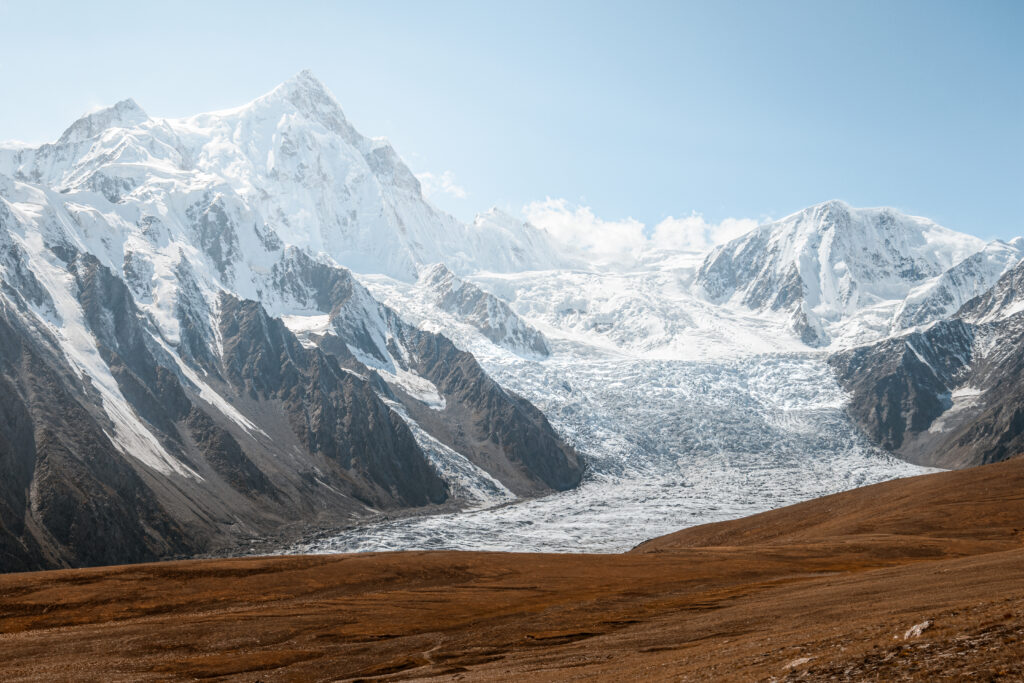
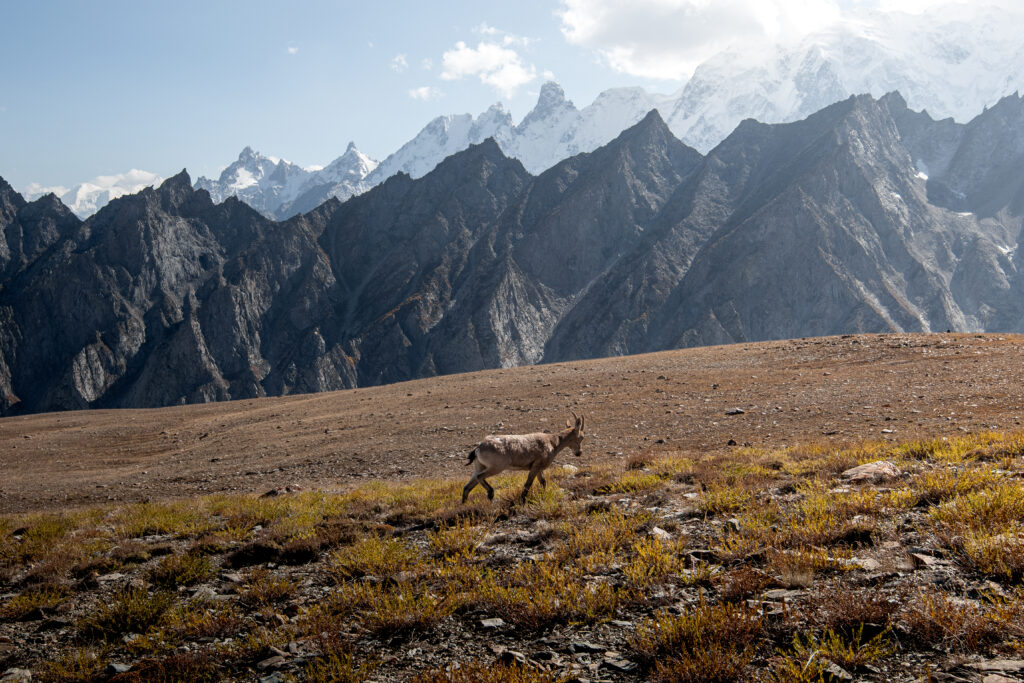
The Patundas Plateau unfolded before us, a sweeping high-altitude meadow perched at nearly 4,200 meters, surrounded on all sides by towering Himalayan giants. Passu Sar, Shispare, Ultar – all rising above 7,000 meters – formed a fortress of ice and rock around us. The Batura Glacier below twisted and shimmered in the midday light, a spine of white splitting the rugged landscape. It felt like standing on the roof of the world.
From here, we walked across the plateau to a makeshift viewpoint where, for the first time, we saw the other side – and with it, the vastness of the Batura Glacier, one of the largest outside the polar regions. I sat at the edge, legs dangling into the drop, in stunned silence. It was impossible to fully absorb the scale and beauty of what lay before me.
 Patundas Meadows Trek: Views of Batura Glacier
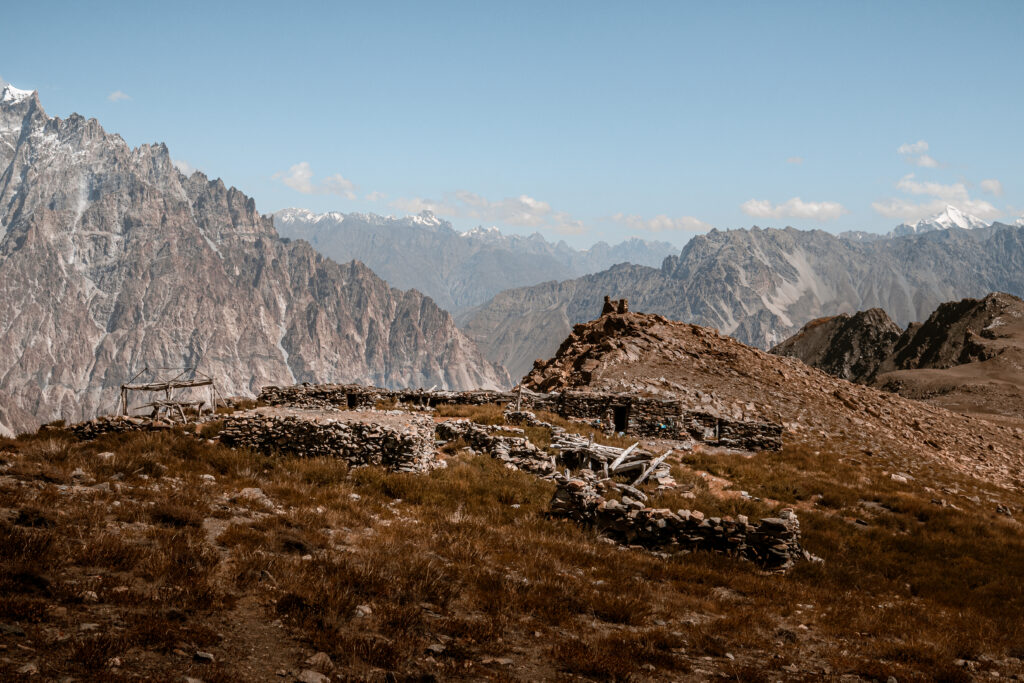 Patundas Meadows at 4200 meters
After a celebratory chai, I wandered further up the ridge alone, chasing better views of the glaciers on either side of the meadow. There was barely a whisper of wind, only the stillness of high altitude. I had the entire plateau to myself, not a single soul in sight. I spent hours simply sitting in the grass, taking photos, soaking it all in. I couldn’t believe a place this wild and surreal was only a two-day trek from a village.
 Views of Shispare Peak and Passu Glacier
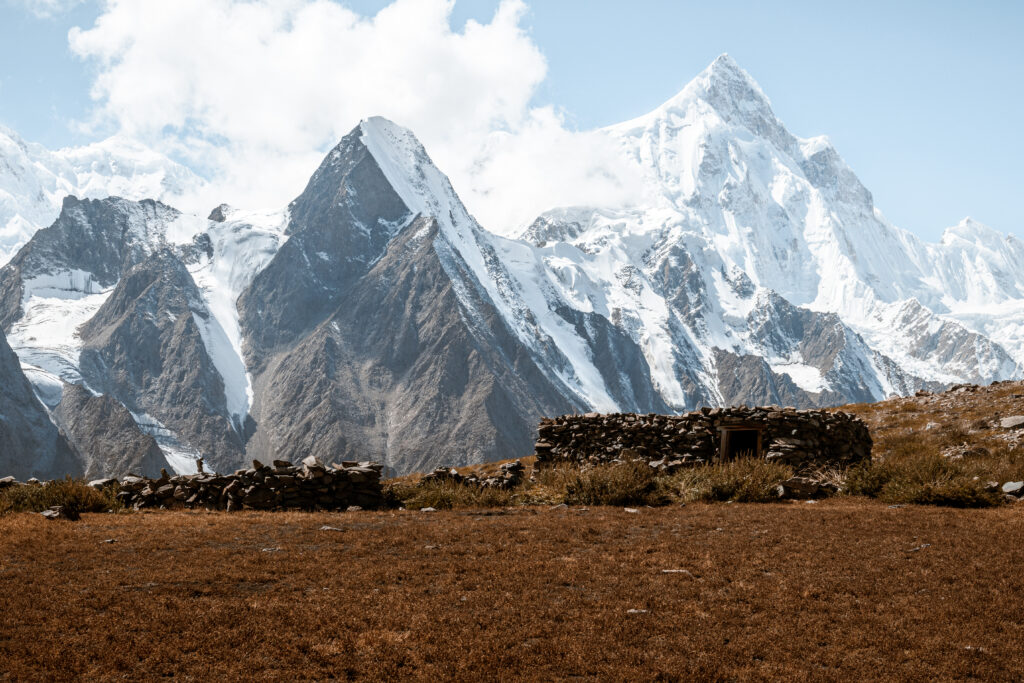 Old Shepherd’s Huts at Patundas Meadows
Then something entirely unexpected happened.
As we prepared to descend, we realised one of our guides was missing. After scanning the ridge line, we finally spotted him – approaching from the distance, dragging something behind him. When he got closer, we saw what he carried: an injured ibex. He had wrapped his scarf around the animal to stabilise it, and was attempting to give it first aid. The poor creature had been attacked by a snow leopard: deep bite marks on its flank, and a badly mangled front leg with the bone visible.
Our guide gently cleaned the wounds, applied Vaseline to prevent infection, and gave the ibex water. For a moment, the wildness of this place wasn’t just in its beauty – it was in its raw, untamed reality. After a while, the ibex limped back toward the mountains, a little steadier, a little stronger.
Eventually, we began our descent. The way down took about two hours, and though my knees protested, my spirit felt light, lifted by everything I’d seen, felt, and experienced.
 Leaving Patundas Meadows
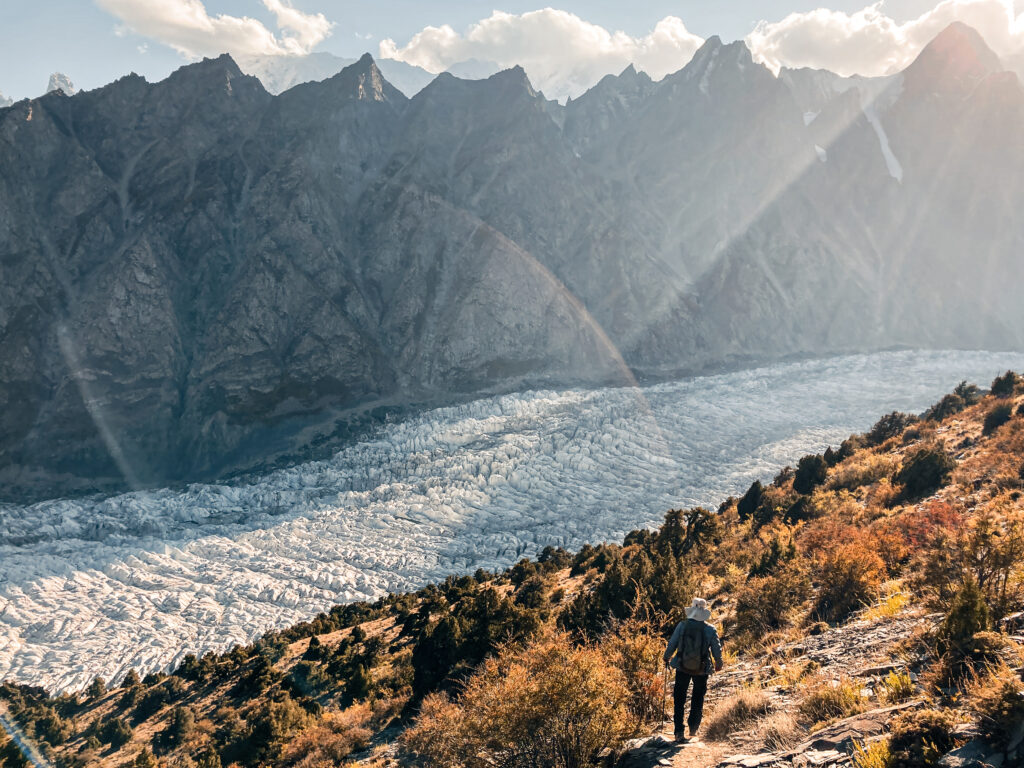 Descending from Patundas Meadows
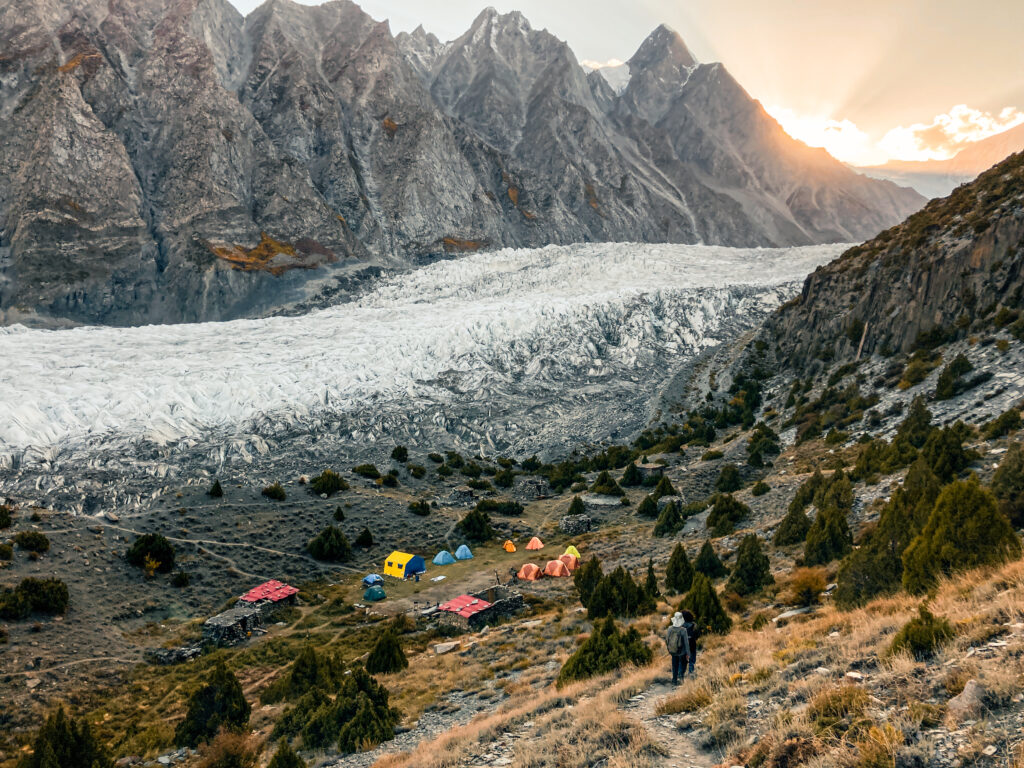 Approaching the Lower Patundas Camp
Back at camp, our guide had dinner waiting: steaming chicken karahi, daal and rice, the perfect reward. We played board games with all the local guides by the fire, the stars blinking into view above, and I slipped into my tent for some well-deserved rest.
 Dinner Prep
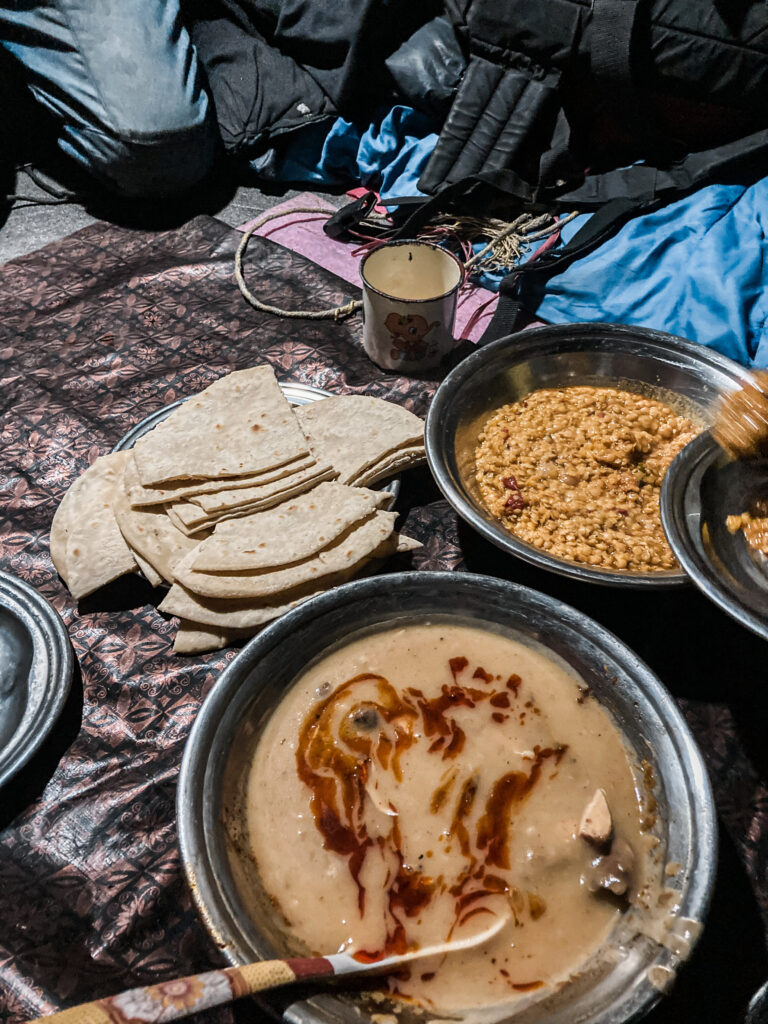 Dinner: Chicken Karahi, daal, rice and chapati
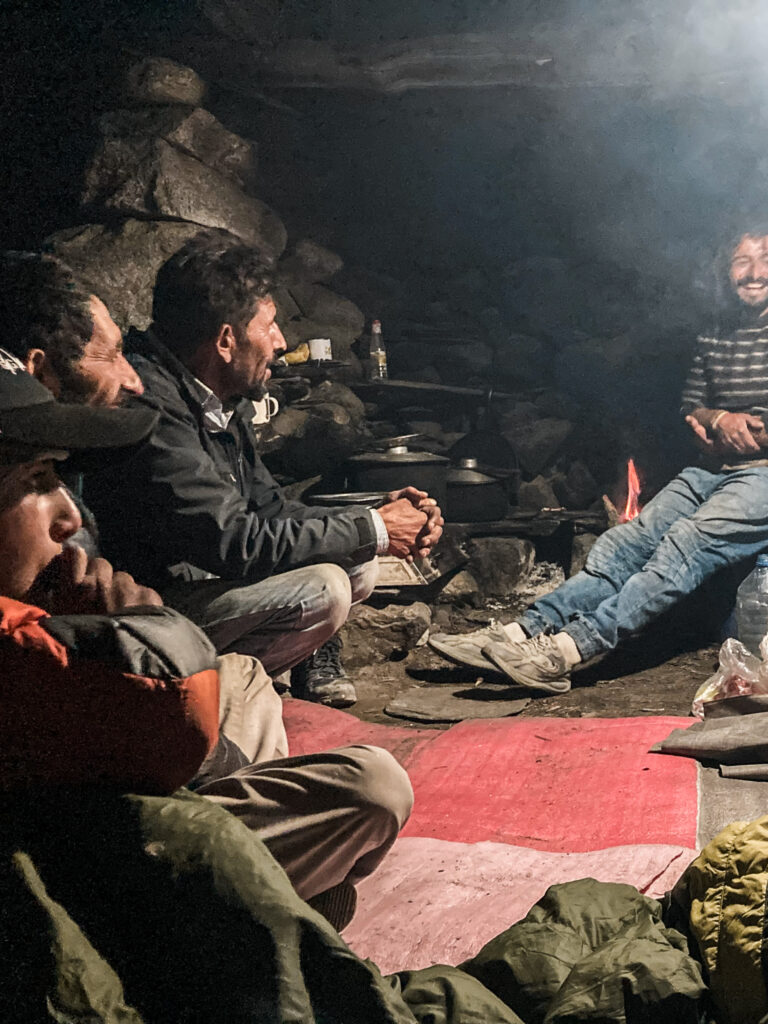 Playing games by the fire with the local guides
Day 3: Glacier Camp to Trailhead
We woke early to clear skies and one last look at the glacier before beginning our descent. After a filling breakfast, we packed up camp and started retracing our steps back toward the glacier – the most nerve-wracking part of the journey still ahead of us.
Crossing it again required just as much care as the first time. Our guide scouted a slightly different route, since the glacier was a lot icier than before. Once again we had to move slowly and deliberately, following his every step across the slick, cracking surface.
 Crossing the Passu Glacier
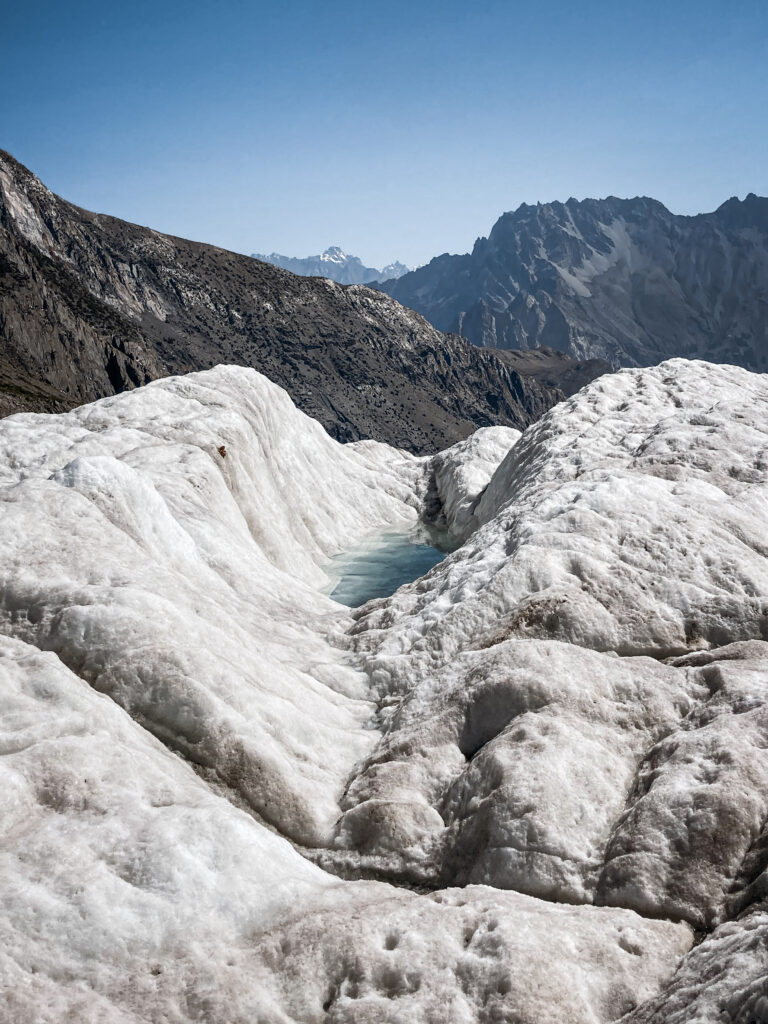 Crossing the Passu Glacier
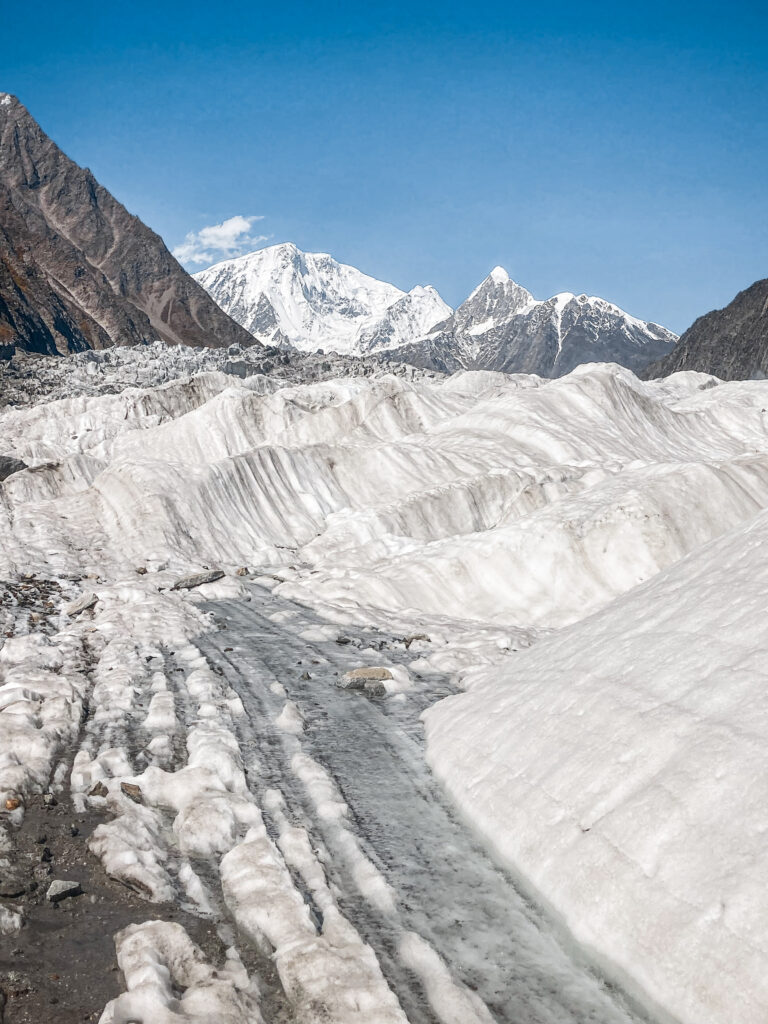 Crossing the Passu Glacier
Once on the other side, the hardest part was behind us. We stopped briefly at the small hut for a breather, then descended along the rocky trail back toward Borith Lake. The air grew warmer and dustier as we lost elevation, and by the time we reached the road, my legs were tired but I felt accomplished.
Patundas had blew my mind and I already knew it would be one of those treks I’d carry with me forever.
Frequently Asked Questions About the Patundas Meadows Trek
How hard is the Patundas Meadows trek? Moderate to challenging. The total distance is around 30km roundtrip with approximately 2,000 metres of elevation gain. You don’t need technical mountaineering experience, but you should be comfortable with full days of hiking on rough terrain, comfortable with heights, and have a reasonable base fitness level. Prior trekking experience at altitude helps significantly.
Do you need a guide for the Patundas trek? Yes, and this isn’t negotiable. The Passu Glacier crossing is dangerous without someone who knows the current route: the glacier shifts constantly, crevasse positions change, and the path is not marked. Even experienced hikers should not attempt this section independently. The good news is you don’t need a tour operator: hire a guide directly in Ghulkin or Passu, which is cheaper and more flexible.
How much does the Patundas trek cost? For our group of 3, we paid $140 per person for 3 days, covering everything: guide and porter fees, transport to the trailhead, all camping gear, and all meals.
How do I get to the Patundas trailhead? The trailhead is near Borith Lake, between Gulmit and Passu in Upper Hunza. The easiest approach is to base yourself in Ghulkin village (about 30 minutes by car from the trailhead) or in Passu.
When is the best time to do the Patundas trek? June to October is the main window. July and August offer the most stable weather and lush green meadows at the plateau. Late September brings cooler temperatures, fewer people, and beautiful golden colours in the valleys below. April and May are possible in a good year but the upper sections may still have snow. Avoid attempting the glacier crossing outside of the main season without checking conditions locally first.
What should I bring that my guide won’t provide? Your guide will provide all camping gear, food, and cooking equipment. What you need to bring yourself: your personal clothing and layers, trekking boots, trekking poles (strongly recommended, especially for the glacier and steep descents), sunscreen, sunglasses, a headlamp, a power bank, and any personal medication. See the full packing list above for details.
Is there mobile signal on the Patundas trek? No. You will have no signal from the moment you leave the main road. Download offline maps before you go. Maps.me and Gaia GPS both work well for this area. Make sure someone knows your trekking plan and expected return date before you set off.
Need help planning your Pakistan trip?
Custom itineraries, local guide sourcing, and on-trip support from someone who’s done it.
Final Thoughts
Of all the treks I’ve done around the world – from the dramatic peaks of Patagonia to the glaciers of Iceland and the remote valleys of Kyrgyzstan – Patundas stands out as one of the most magical treks I’ve ever done. In just a few days, it offers an incredible variety: high-altitude plateaus, a glacier crossing, solitude, and a front-row seat to some of the most spectacular mountain scenery on Earth.
But more than that, it’s the feeling of Patundas that stays with you. The stillness at the top, surrounded by giants over 6,000 metres tall. The challenge of navigating a glacier. The camaraderie of the trail. It’s raw, untouched, and humbling, the kind of place that makes the world feel vast again.
If you’re looking for a trek that delivers true adventure, unspoiled nature, and unforgettable mountain moments, Patundas will not disappoint. Go before the world catches on.
If Patundas has sparked your curiosity, you’ll be glad to know it’s just one of many unforgettable treks Pakistan has to offer. This country is filled with trails that range from accessible day hikes to challenging multi-day adventures. If you’re planning a trekking trip and want to explore beyond Patundas, check out my complete guide to trekking in Pakistan where I share detailed information on routes, difficulty levels, and tips for independent travellers.
More Pakistan Travel Guides
If you’re planning to travel Pakistan independently, these in-depth guides will help you navigate the country, travel on a budget, and explore far beyond the usual routes:
Have questions about the Patundas Meadows Trek? Drop them in the comments. I read every single one.